This is an unofficial plugin, please don’t harass the devs of either program if you have issues with the plugin.
This Plugin is free, but you need to buy the Touch Portal Pro upgrade to install and use Plugins.


Table of Contents
- Table of Contents
- Requirements
- Releases
- Getting Help
- Links
- License
- Installing the Plugin
- Plugin Settings
- Setting up Pages in Touch Portal for veadotube mini
- Setting up Pages in Touch Portal for veadotube
Requirements
- Java 8 Runtime or later
- Touch Portal (The pro upgrade bought through the Android/iOS Store needed to use Plugins)
And one of both of the following:
- veadotube Mini v2.0 or higher (Older versions are NOT supported)
- veadotube v0.6 (Access is currently in early access)
Releases
The latest version is 0.8.3.
- Beta release - stable enough for general use but testing is ongoing.
- Tested with
- veadotube mini v2.0a, v2.1, & v2.2
- veadotube v0.6
- The following features are planned before 1.0 release
- Update Notification (In place but not fully tested)
- Actions for controlling specific named instances (In place for veadotube but not fully tested, not complete for Mini)
All releases are available here.
Getting Help
The easiest way to get help is to ask in the Touch Portal Discord under Plugins > Streaming > Veadotube
Links
License
- This Plugin Licensed under GPL v3, and is Free to use in accordance with any Licenses and Agreements
Installing the Plugin
- Download the latest release from GitHub
- There are 2 Versions: ‘Regular’ and ‘Internal’/’Bundled’ Java.
- ‘Regular’ Requires Java 8 or later installed and works on Windows/MacOS/Linux.
- If in doubt, install Java and use this version.
- ‘Internal Java’ uses the version of Java Bundled with Touch Portal (JRE 17).
- Doesn’t require Java installed separately and tends to use less CPU and Memory.
- This is tested as working on Windows, but macOS and Linux may have issues.
- ‘Regular’ Requires Java 8 or later installed and works on Windows/MacOS/Linux.
- There are 2 Versions: ‘Regular’ and ‘Internal’/’Bundled’ Java.
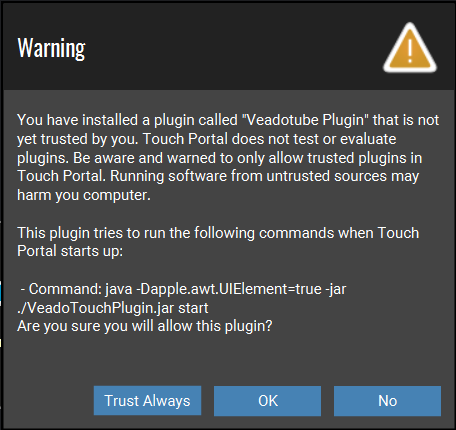
- Import the plugin into Touch Portal on the computer veadotube is running on
- Touch Portal will show a warning, asking if you want to allow the Plugin to run.
Select Yes or Trust Always to let it run Yes will make Touch Portal ask you again each time it starts
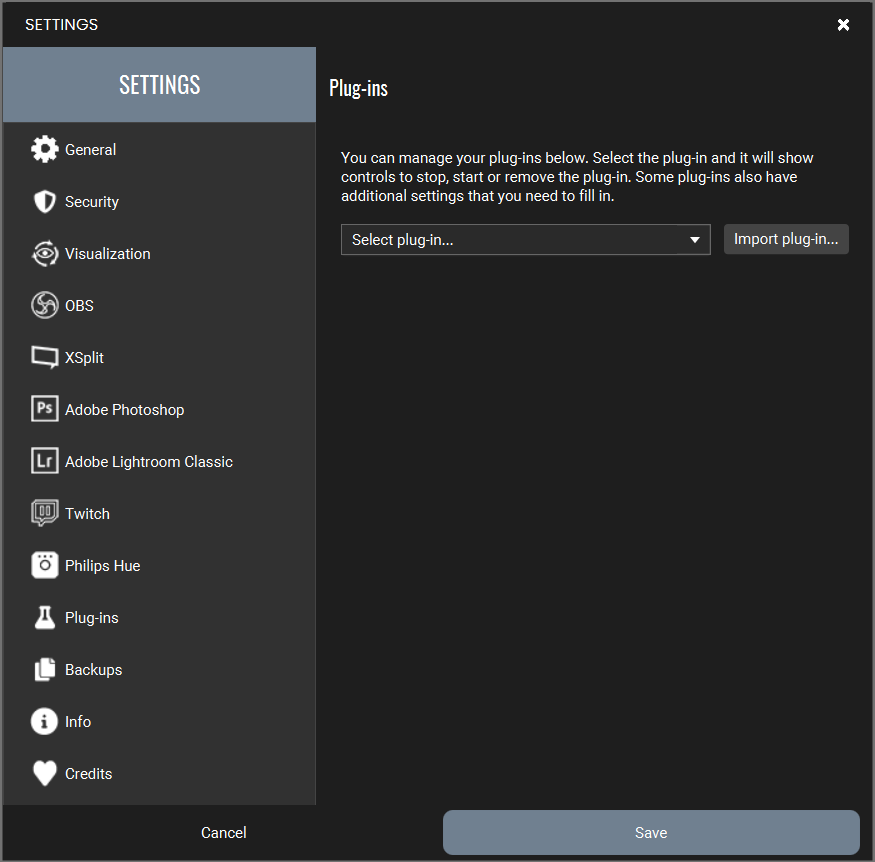
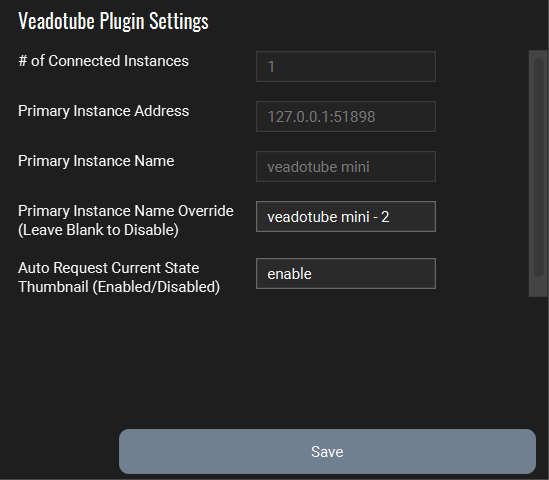
Plugin Settings
These are optional, but you will want to enable Auto Request Current State Thumbnail if you plan to have Touch Portal display a State/Avatar
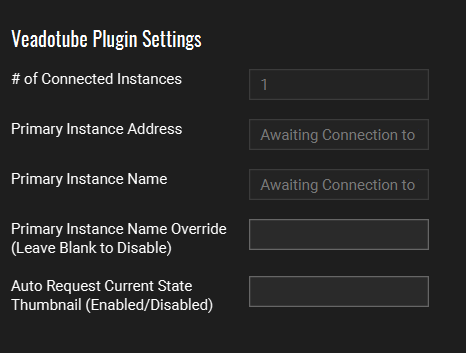
Primary Instance Name Override (mini)
If you run more than one copy of veadotube mini and have changed the window title, you can enter it here to force the plugin to treat it as the ‘Primary Instance’ when control it.
Note: If nothing is entered, or if no match is found, the oldest running window/instance is controlled by default
Auto Request Current State Thumbnail
If you want a Button to show the thumbnail current Avatar State, type ‘enable’ and the plugin will fetch it for you
Example:
Only one copy of veadotube Mini is running, it has the default title.
A Primary Instance name has been entered, but no mini with the title is running - the plugin has fallen back to the oldest instance.
‘enable’ has been entered for Auto Request Thumbnail
Setting up Pages in Touch Portal for veadotube mini
You can find an example Touch Portal Page you can download and import here
The example page and the examples below use one of the default avatars, O Gato by BELLA!
You can find it in veadotube Mini by clicking Avatar Settings > Load Default Avatar…
Basic Button Setup
The Plugin Actions can be found under Veadotube - Primary Instance
Basic Avatar Change Trigger
-
Make sure you have the Avatar you want to use open in veadotube
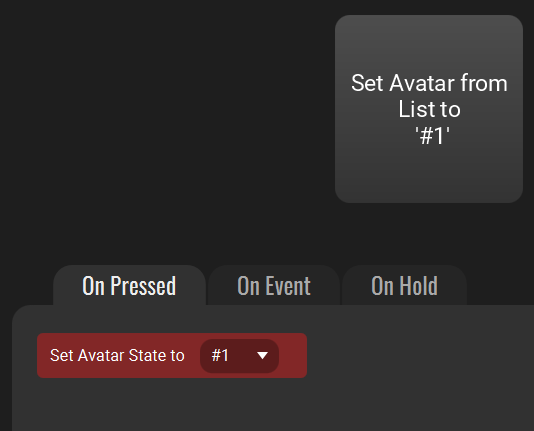
- Add Set Primary Mini Avatar State from List to your button
- Alternatively you can use Set Primary Mini Avatar State by Name if you’d prefer to use a text box or Touch Portal Value to set the name
- Set the avatar you want this button to activate.
- If using Set Primary Mini Avatar State from List, click the dropdown arrow to show all the current Avatars.
You will see the state name, or number assigned by veadotube if you didn’t set one.
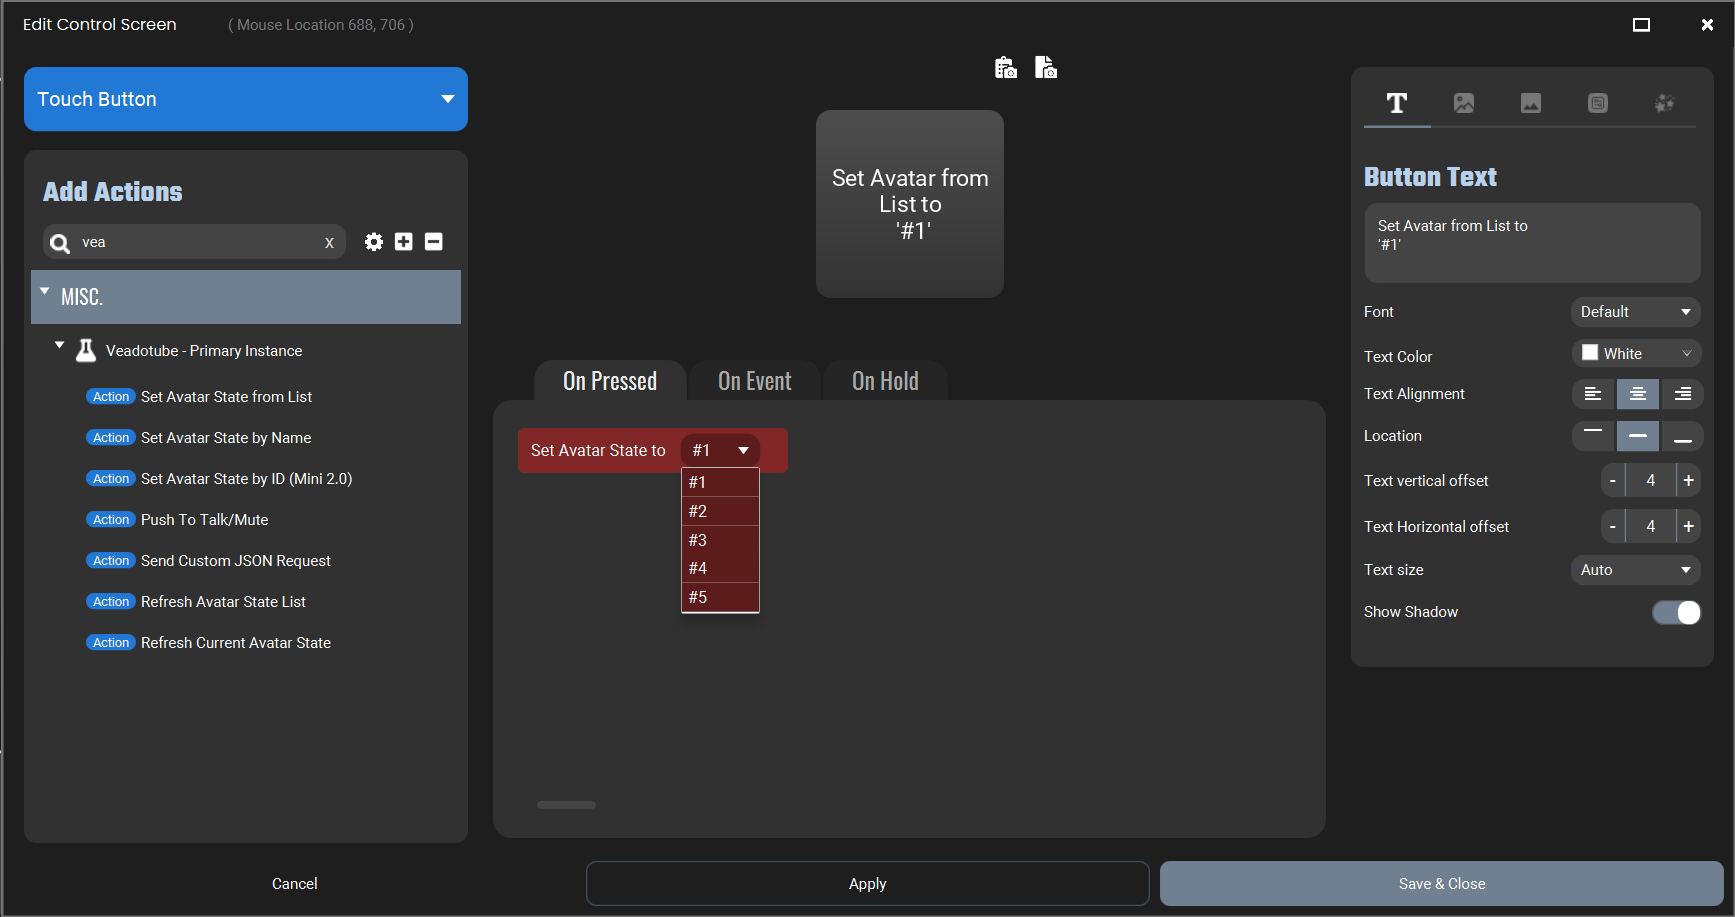
- Alternatively if you’re using Set Primary Mini Avatar State by Name, you can copy & paste the State name from veadotube into the text box.
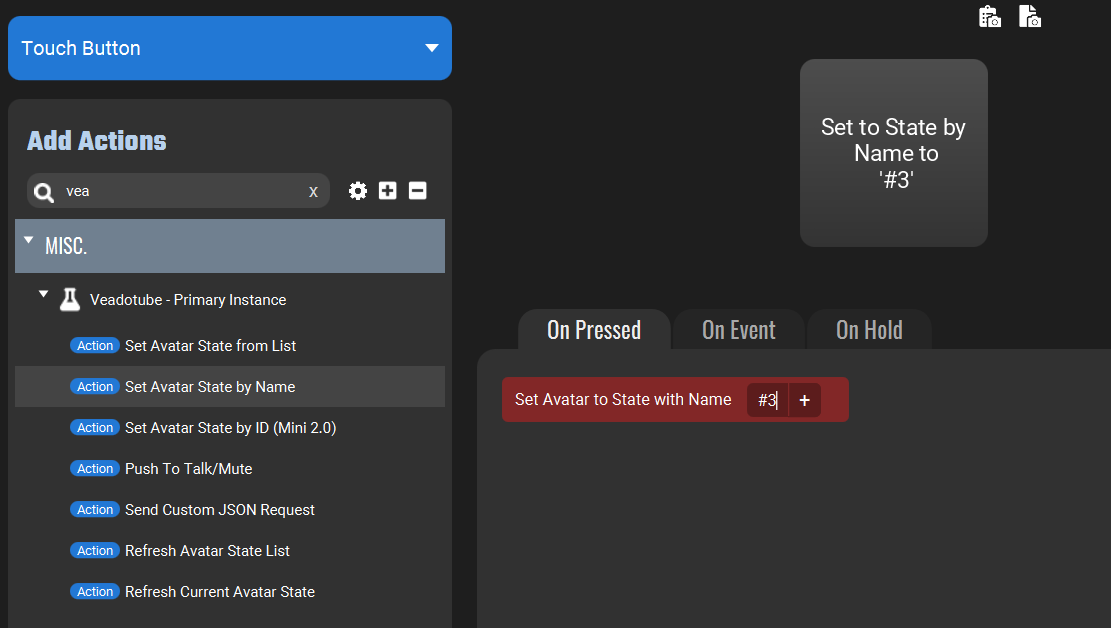
Note: Changing the name of a State in veadotube will break your Touch Portal buttons - you will need to come back and update the buttons of any you change.
- If using Set Primary Mini Avatar State from List, click the dropdown arrow to show all the current Avatars.
You will see the state name, or number assigned by veadotube if you didn’t set one.
-
Set the Button Text, Background, etc.
- Repeat with other buttons
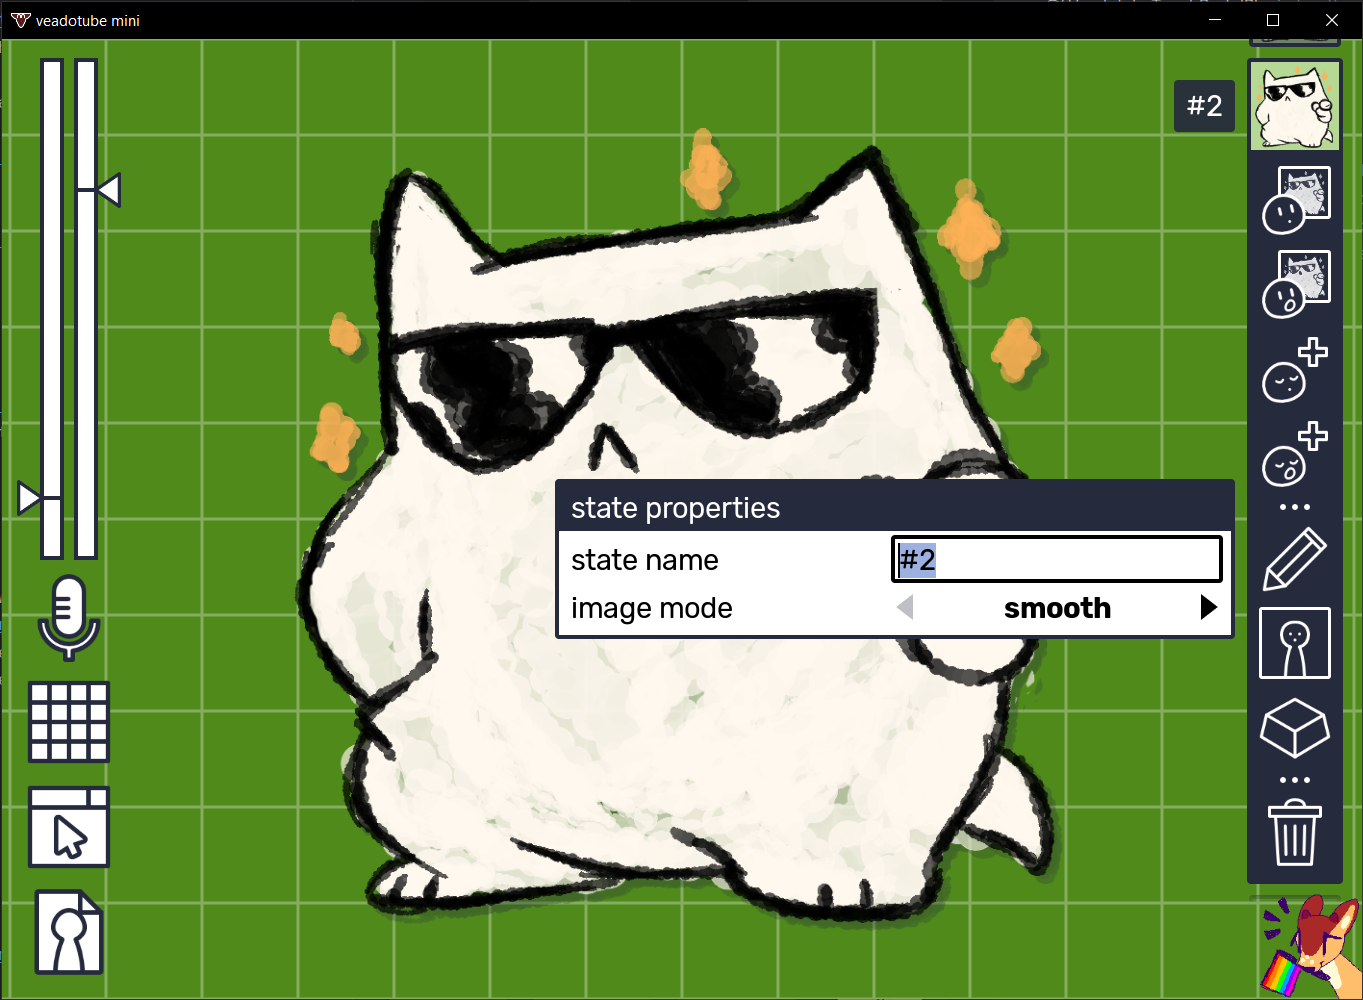 Opening the avatar state in veadotube shows the name box - you can copy this into Touch Portal text boxes
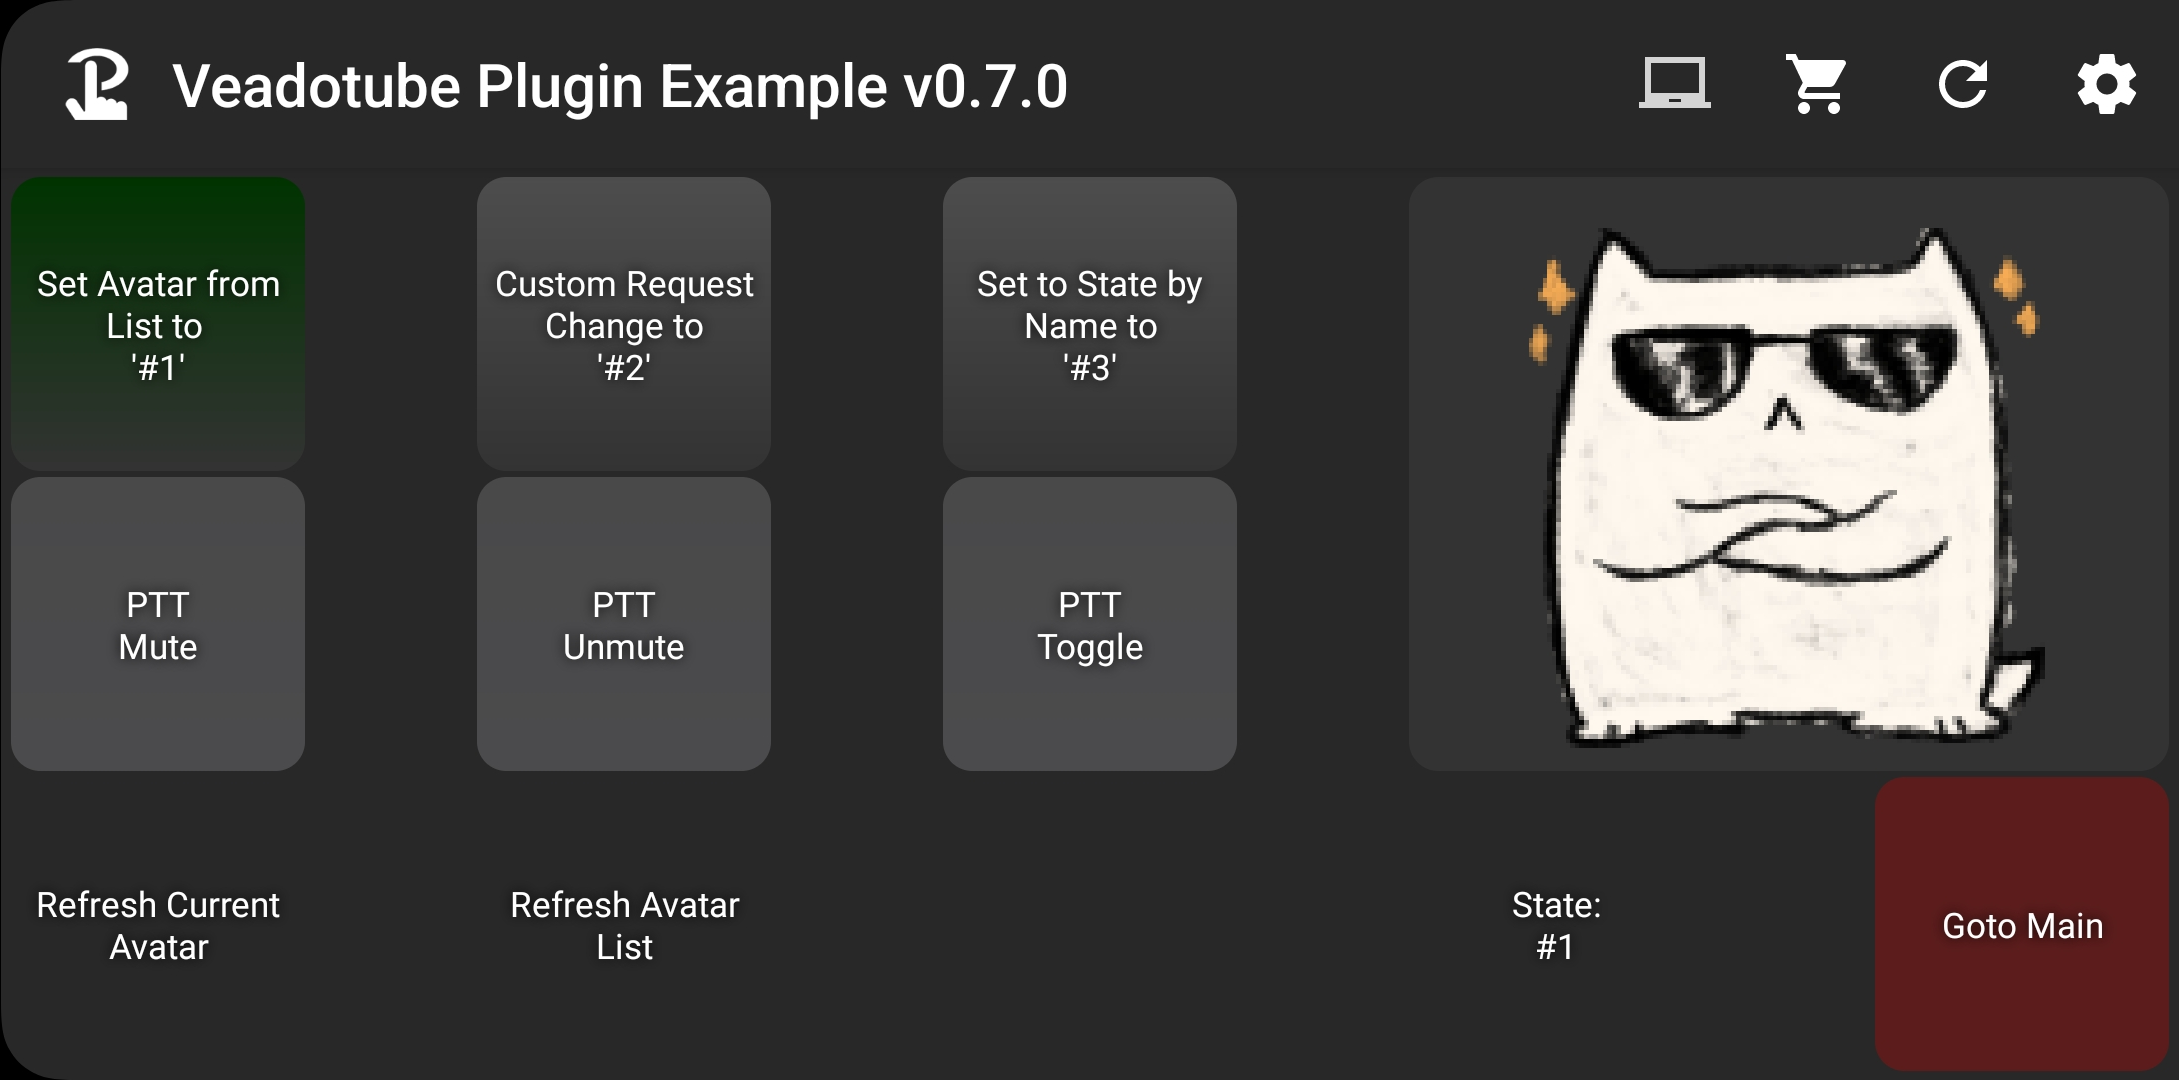
You can now press the buttons and change the active avatar!
Note: Here When Plug-in state changes has been used to make the buttons reactive - If you want buttons to change with the state, even when changed directly in veadotube, see under Advanced Buttons below
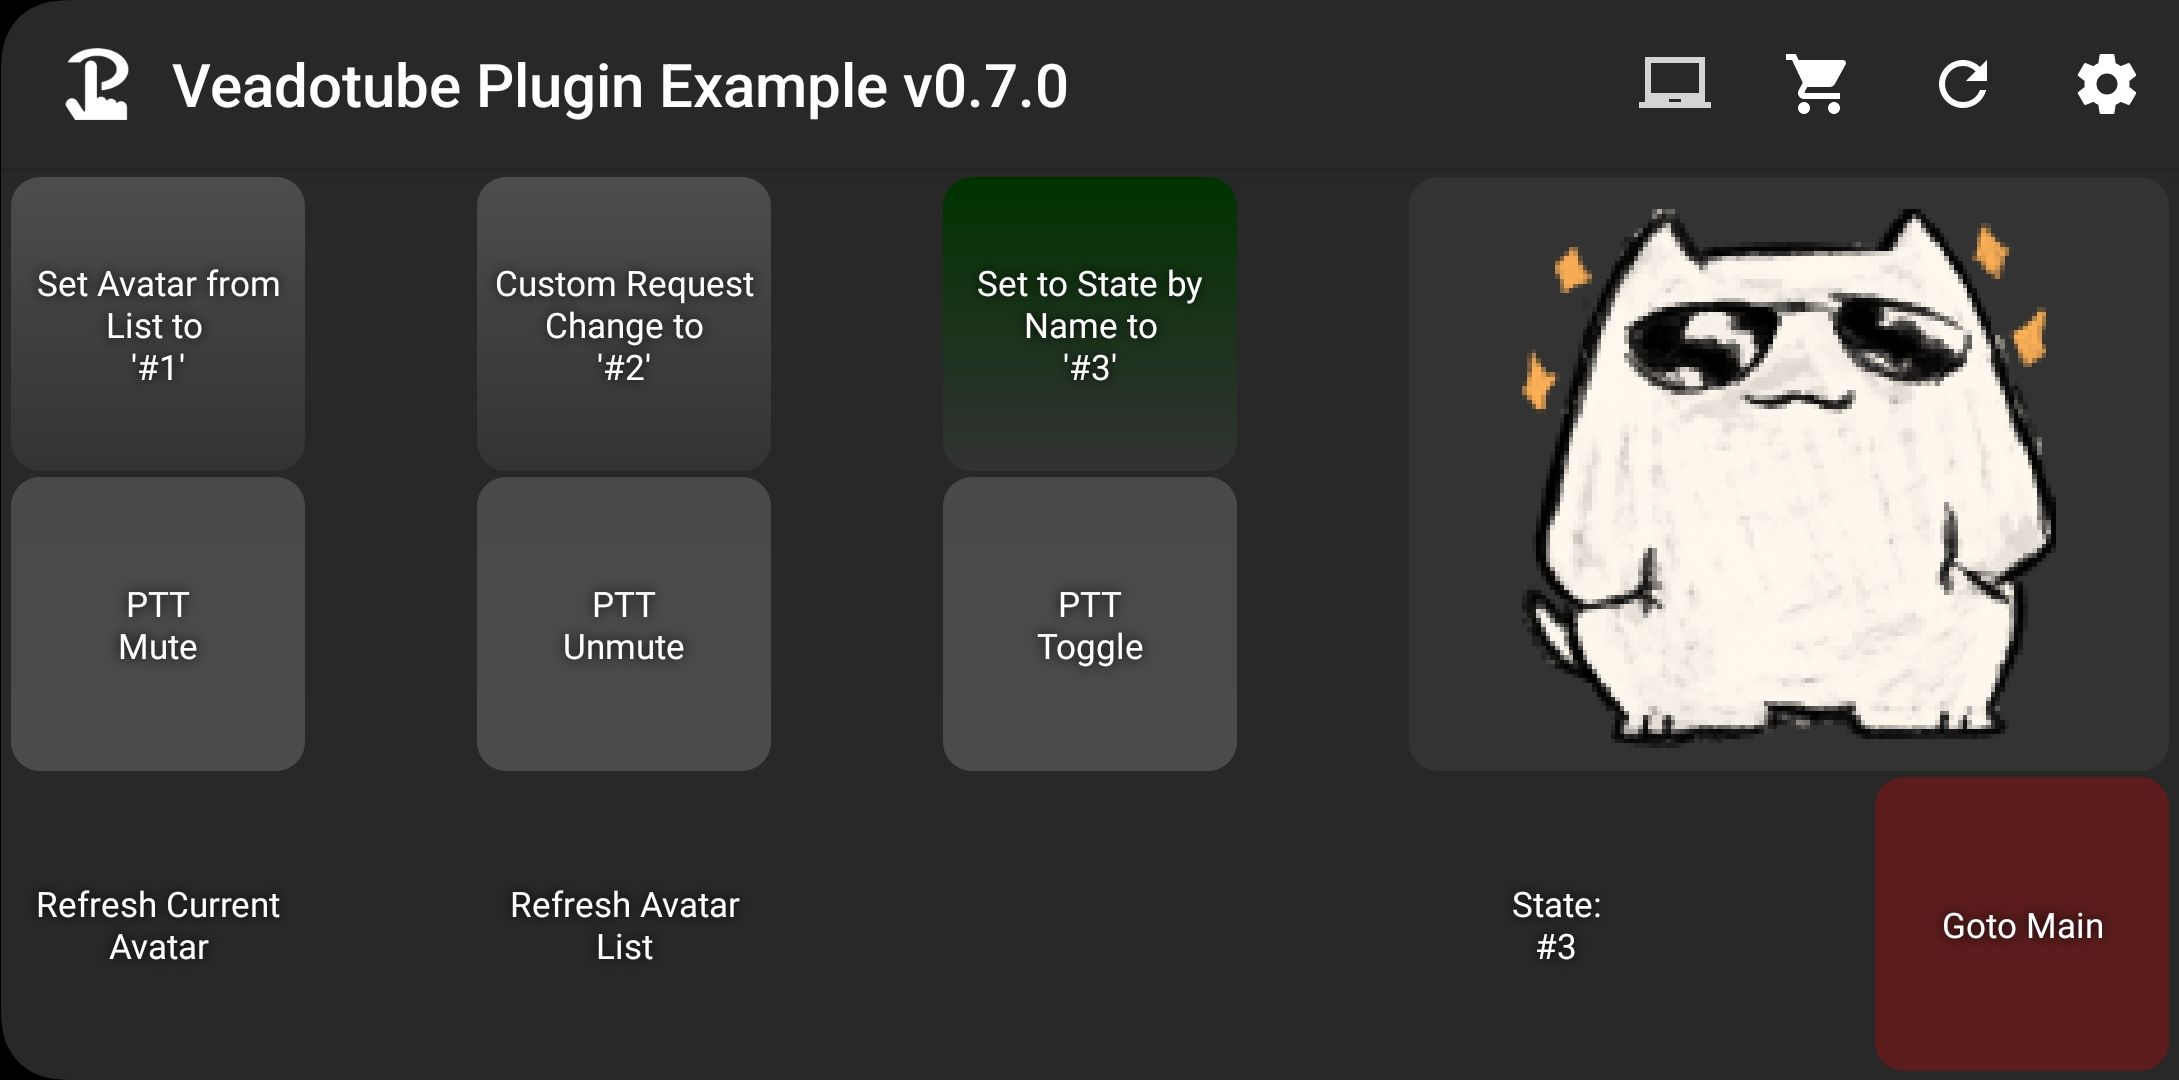 After Pressing Button #3
After Pressing Button #1
Reactive Buttons
You can set up the buttons to react to the Avatar State Changing - this also works if you change it by clicking directly in veadotube
Add:
-
Event: When Plugin State Changes
Choose Veadotube Plugin > Primary Instance > Current Avatar State - Name

-
Set the 2nd box to ‘changes to’ and the 3rd to the Avatar Name (you can copy and paste this from veadotube)
-
Add a Change Button Visuals action inside the event and choose how you want the button to show the Avatar State is active
-
Copy the When Plugin State Changes event but set the 2nd box to does not change to and add a Restore button visuals action
-
Repeat on your other buttons
Now you can see which avatar is active by the button that’s highlighted
 Avatar State #1 is Active
Avatar State #3 is Active
Use Current Avatar State as an Icon
If you’ve enabled Auto Request Current State Thumbnail you can create a ‘button’ that shows the current Avatar
You can create this by adding:
-
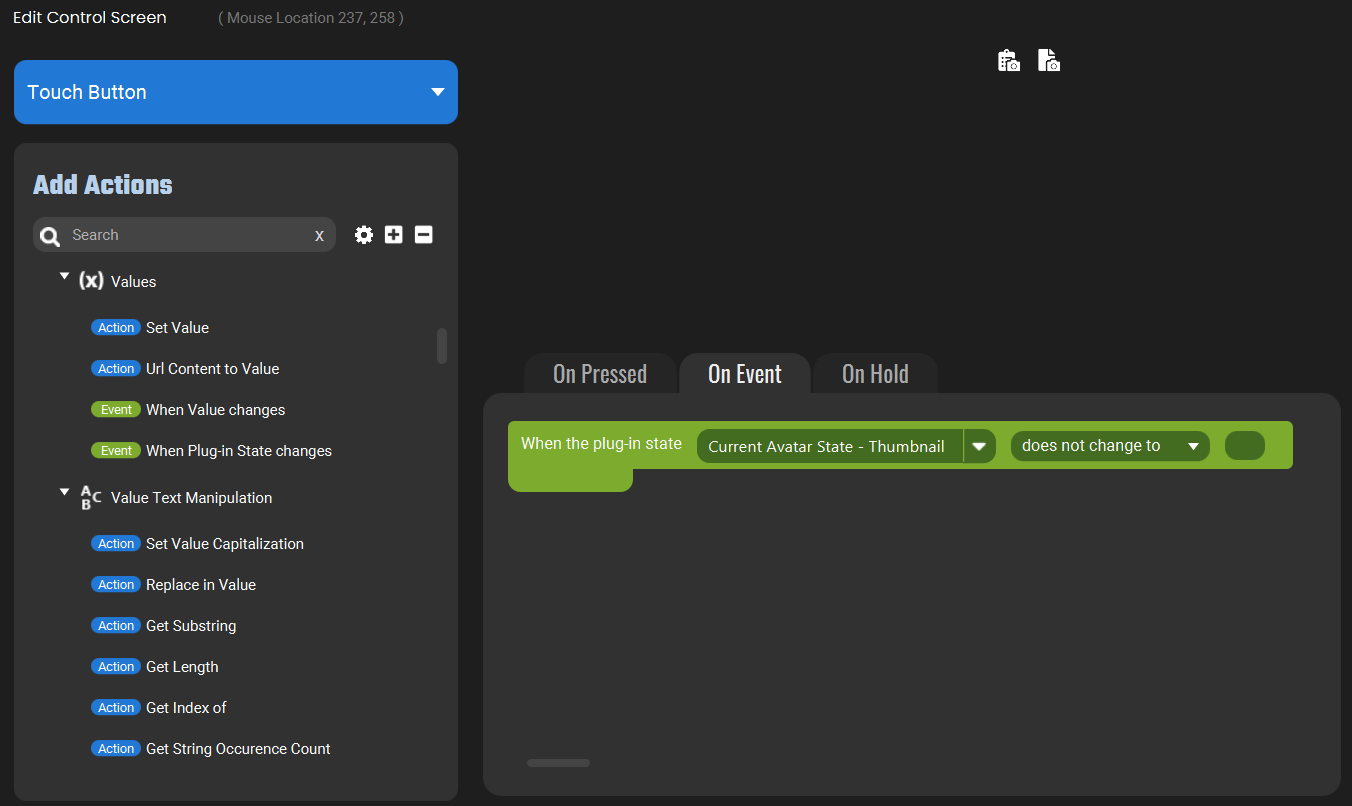
Event: When Plugin State Changes
Choose Veadotube Plugin > Primary Instance > Current Avatar State - Thumbnail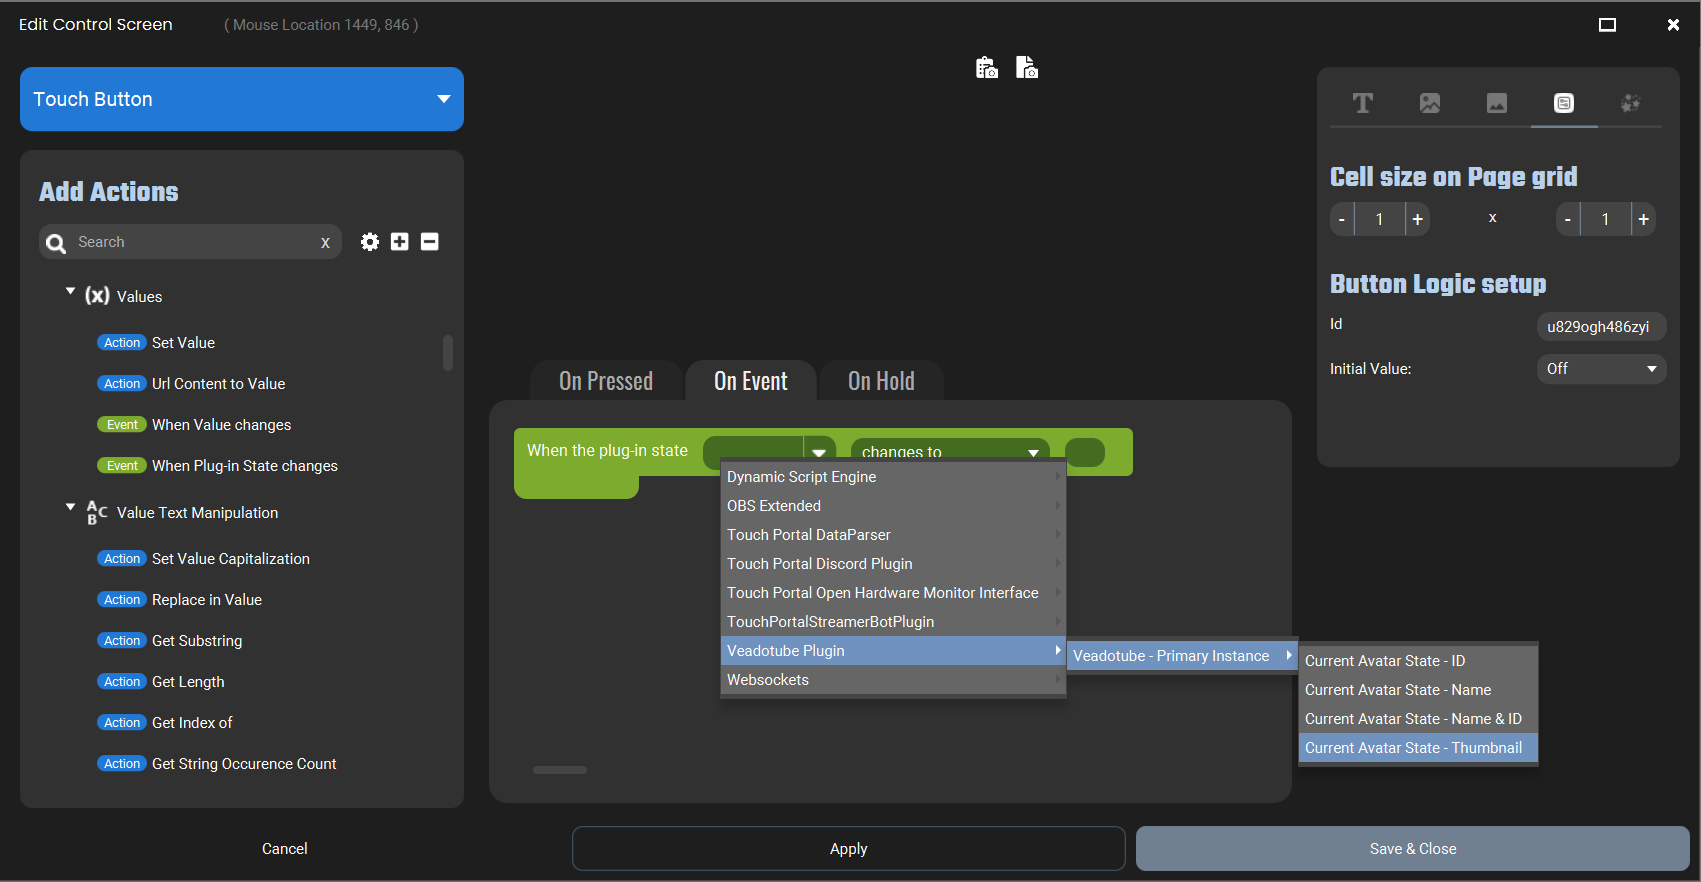
Set the 2nd box to does not change to, and leave the 3rd box blank
-
Inside the Event, add Change visuals by Plugin State and select Icon and Current Avatar State - Thumbnail
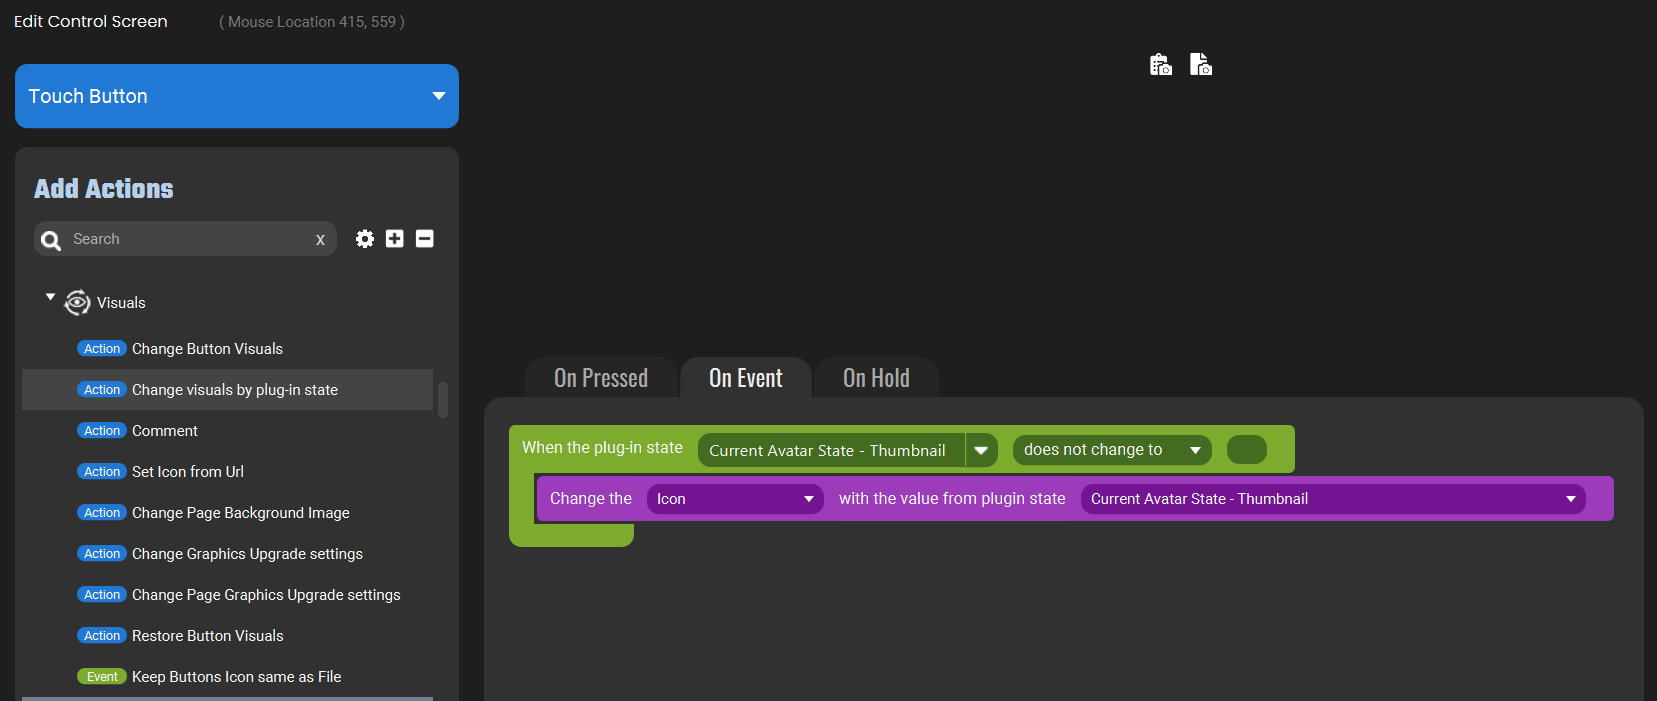
Now the Icon will change when the Avatar does - even if it’s changed directly in the app!
Show active Avatar State name
You can set a ‘button’ to show the name of the currently active avatar
Add:
-
Event: When Plugin State Changes
Choose Veadotube Plugin > Primary Instance > Current Mini Avatar State - Name and does not change to
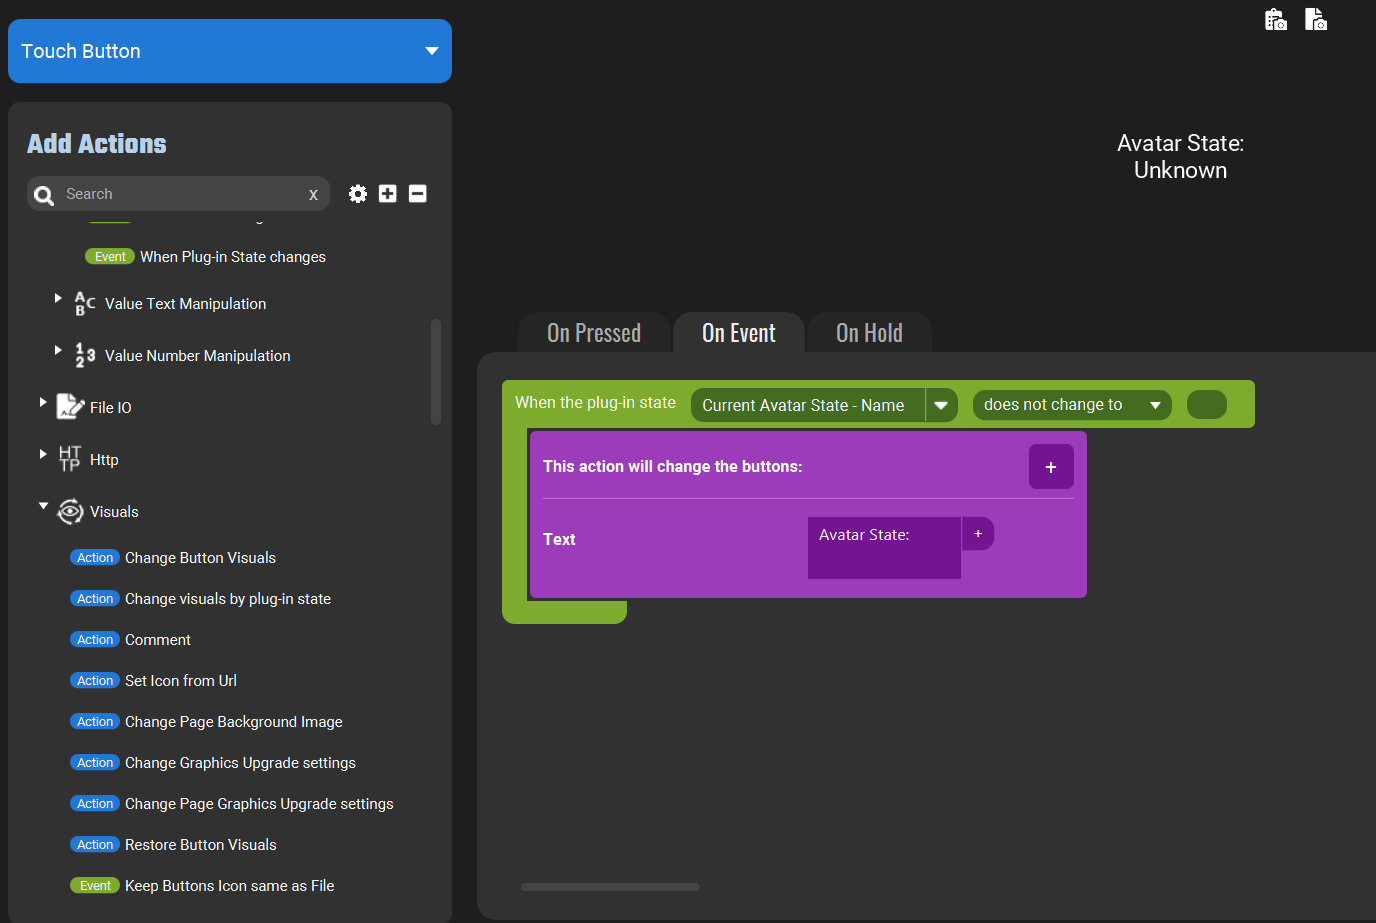
You can leave the next box blank to only change when the value is not blank, or enter something else (e.g. ` ) to also change when the value is cleared. -
Add a Change Button Visuals action inside the event and set it to use the Name to change the button text
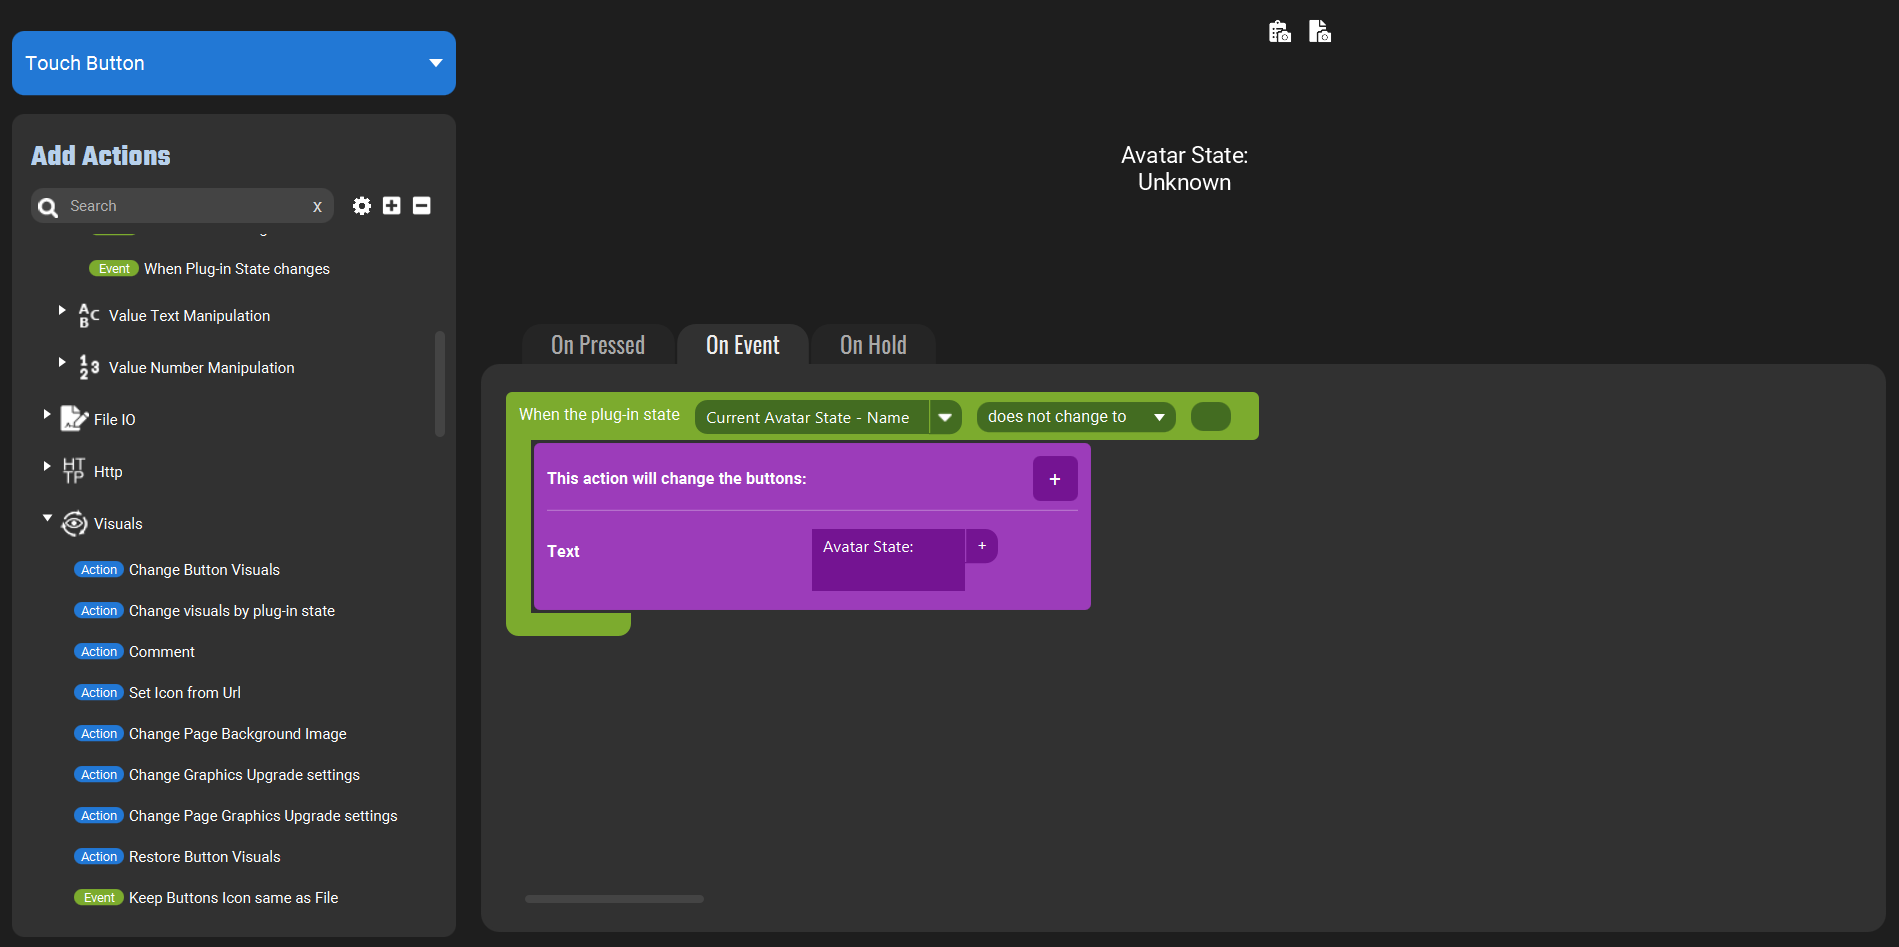
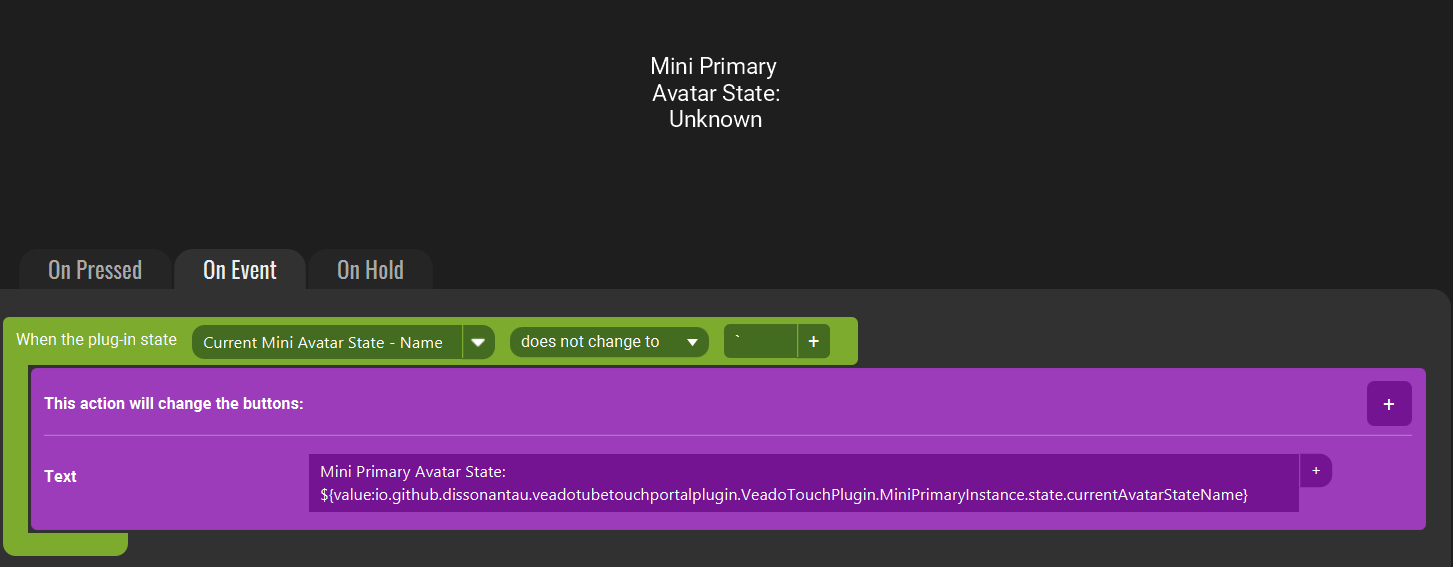
You can add other Text to the change action as well
The Button should now show the current active Avatar Name
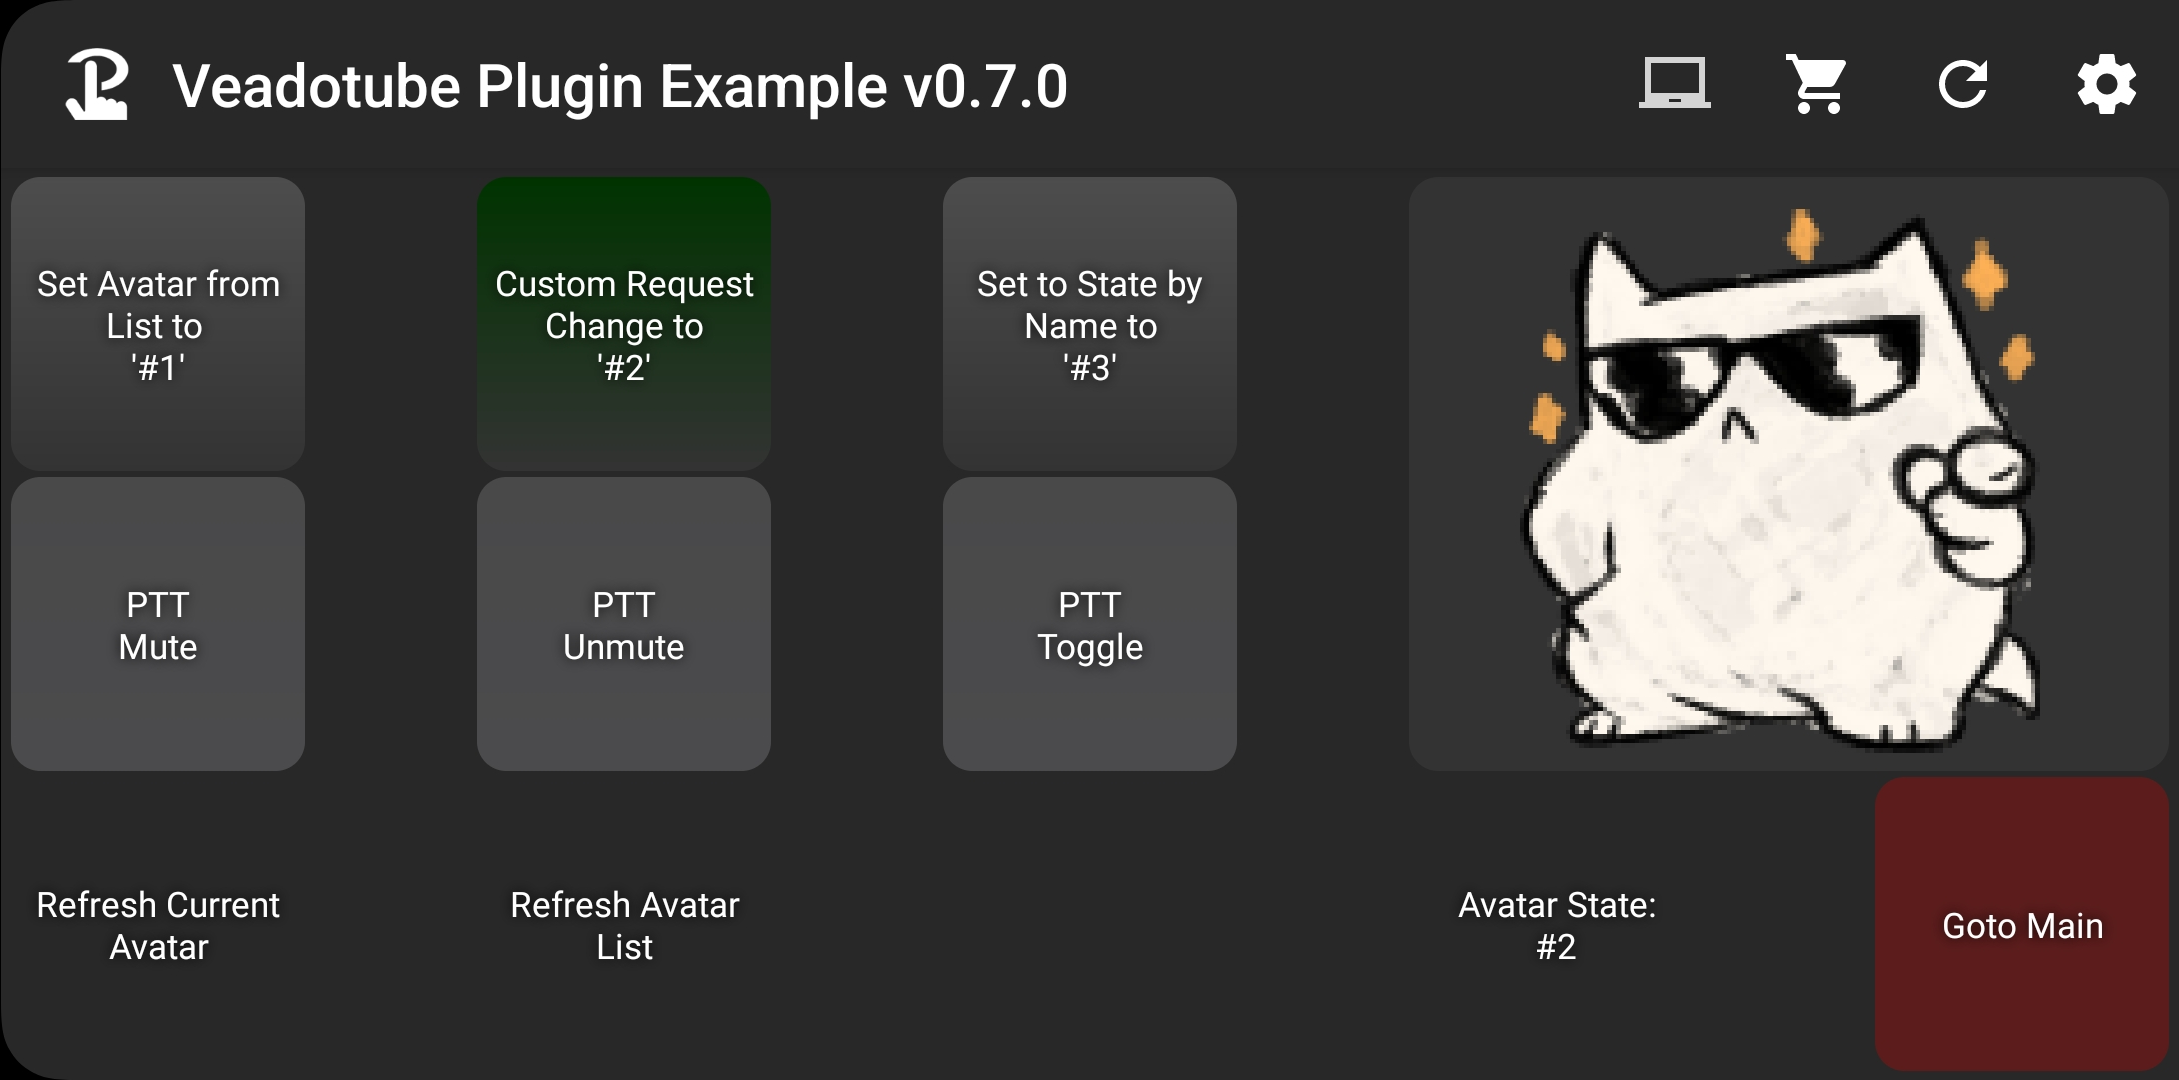
Advanced - Custom JSON Requests
You can send custom JSON Messages to the API, useful if you want to use an API feature that’s not supported directly by this plugin
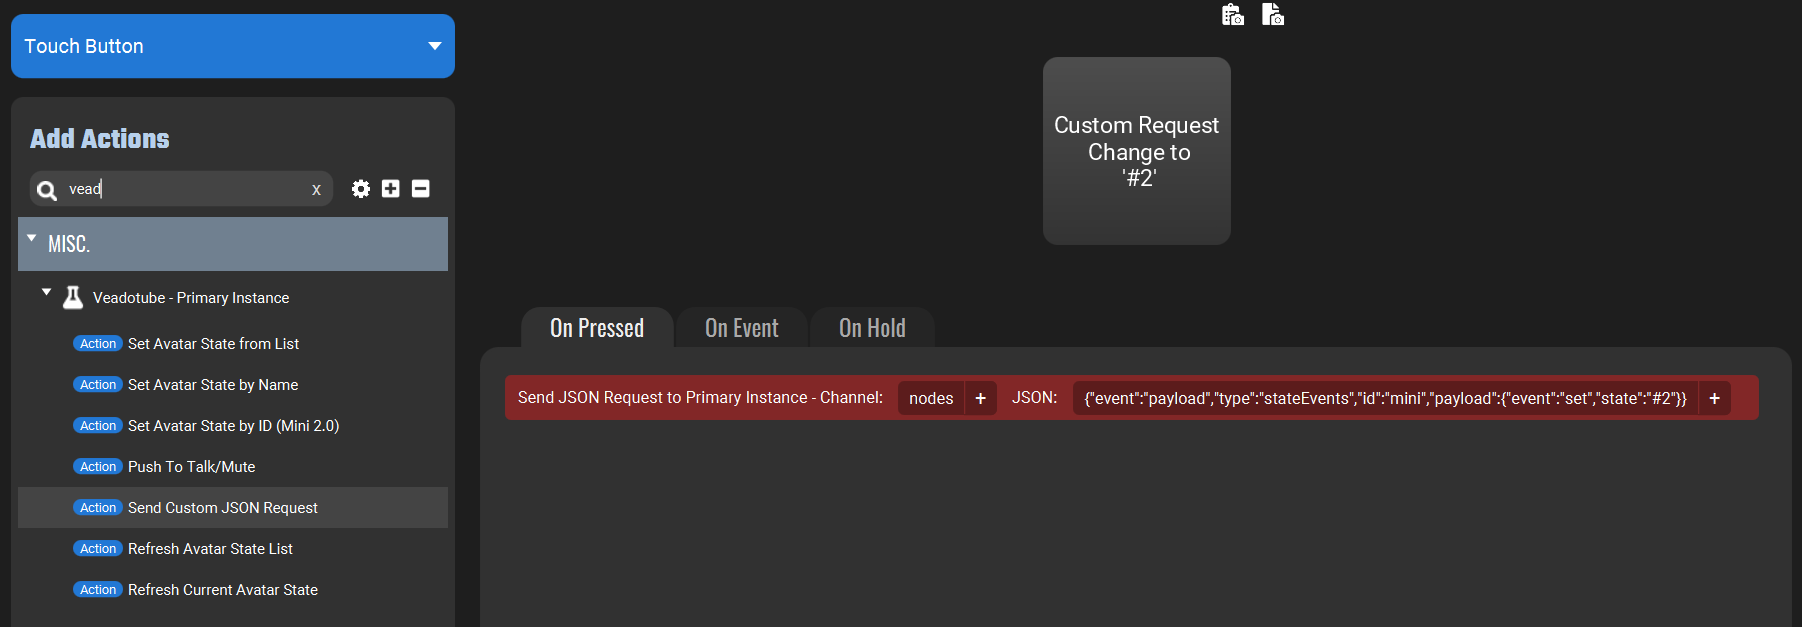
In this example you can see a Custom JSON Request to set the avatar state to ‘#2’ to be sent to the ‘nodes’ channel
Advanced - Multiple Instances
You can manage multiple mini instances at the same time though Instance Numbers and Titles
Note: Currently functions for Sending commands by Title aren’t available for Mini, but values are accessible as Plugin States
Instance Numbers are based on the order that each instance started (1 is first) and that number is held until it is fully closed.
- The number will persist even if websockets are turned off and on again and will only clear on full close, after which a newly started instance can take it.
Instance Titles are a shortened, version of the title with the start (‘veadotube mini - ‘) and some character types removed.
- If an instance doesn’t have a custom title, the mini ‘ID’ generated at launch is used instead.
If the Title is updated, the old title values will be deleted and new ones for the new title will be created.
Titles and Numbers of Instances are also available under Mini Instances > Active Mini Instances
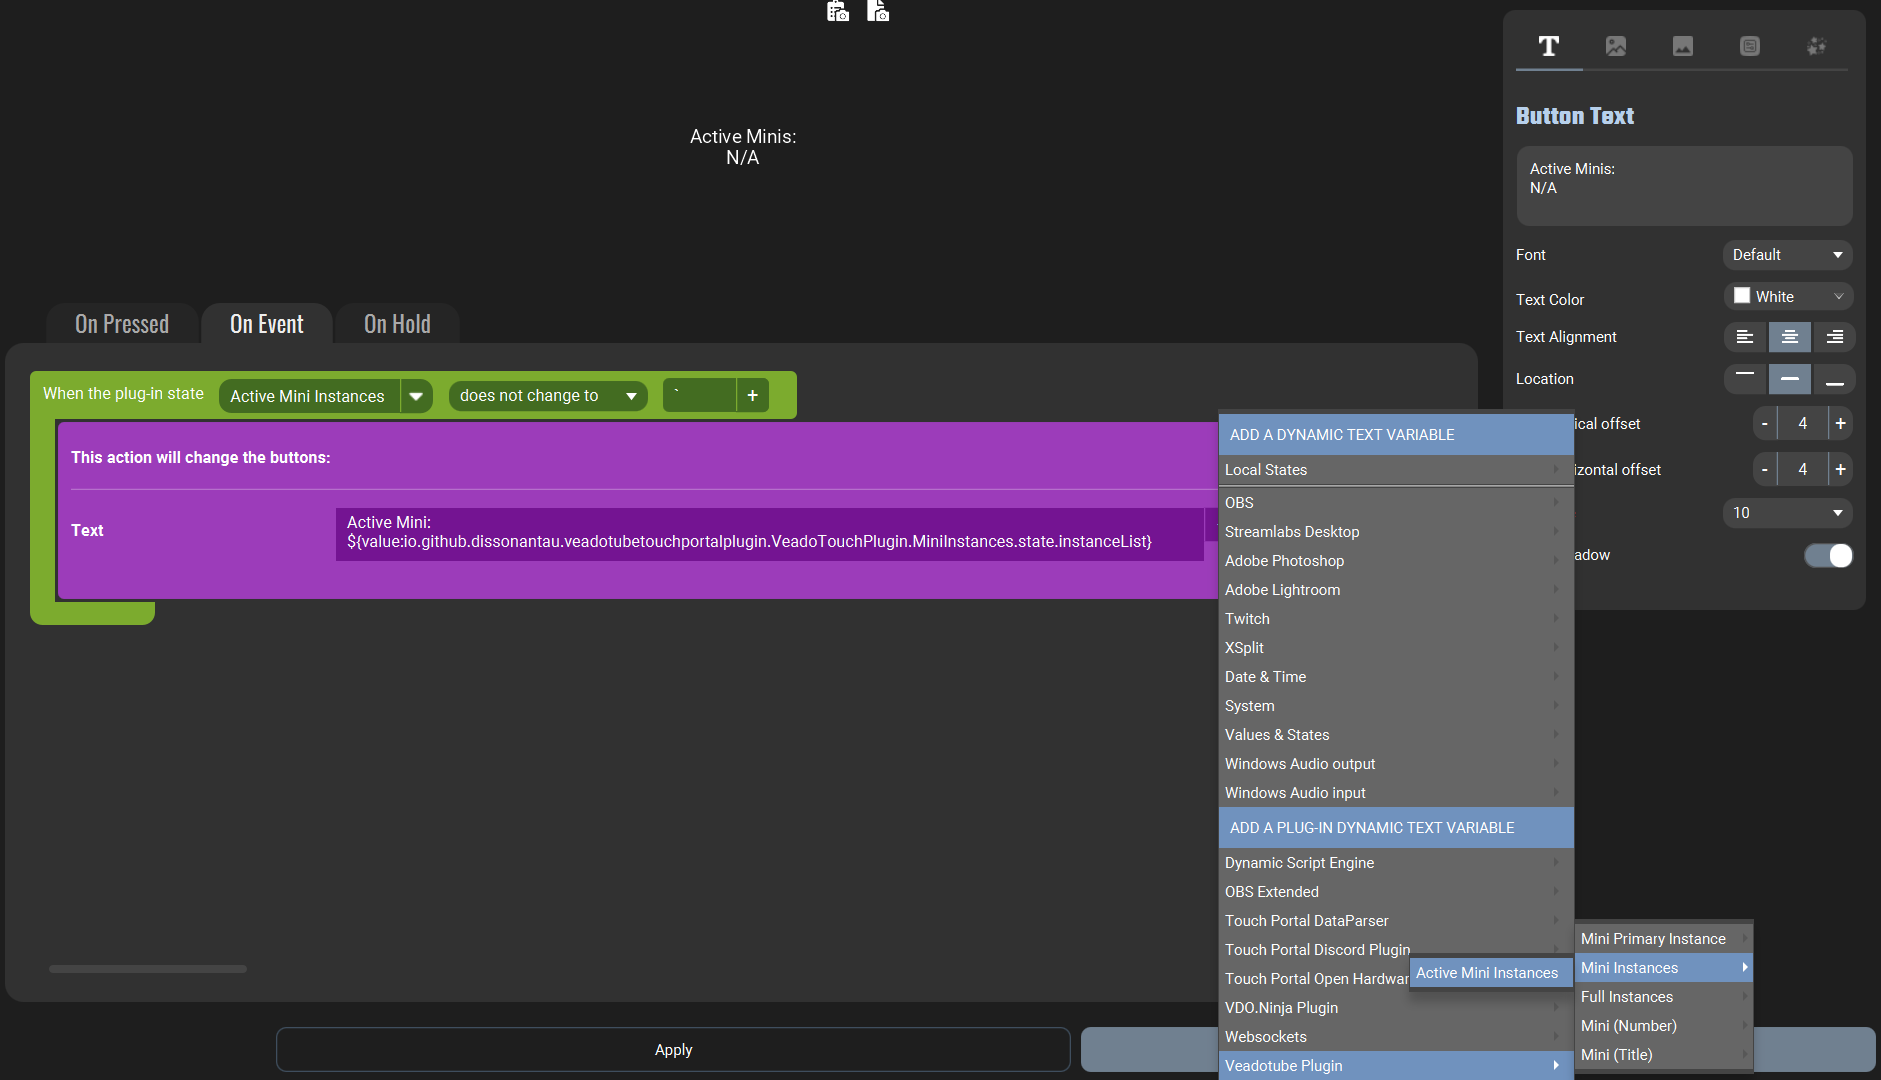
Dynamic Plugin Variables
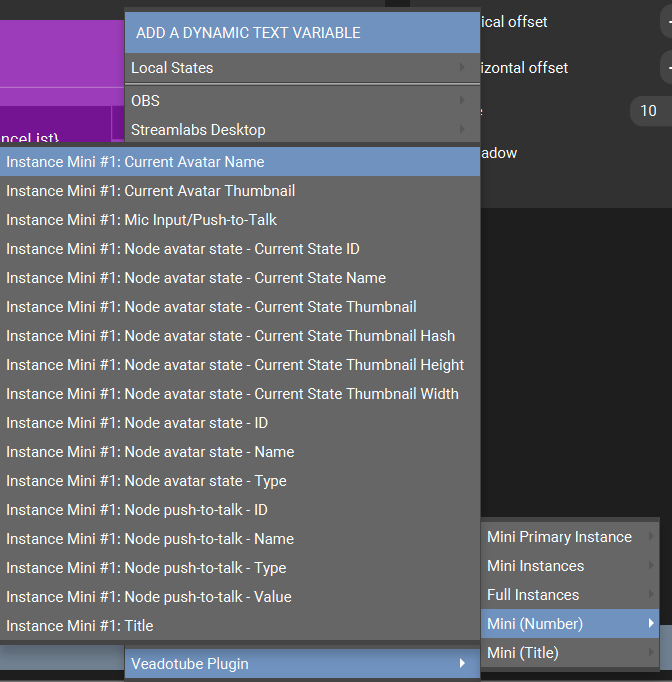
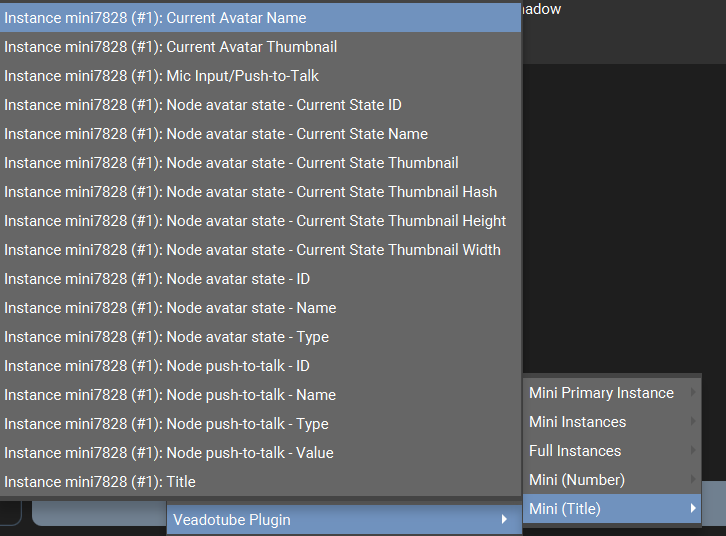
Depending on your version of Touch Portal, the Instance values may appear under ‘Dynamic States’ instead of Mini Number or Mini (Title)
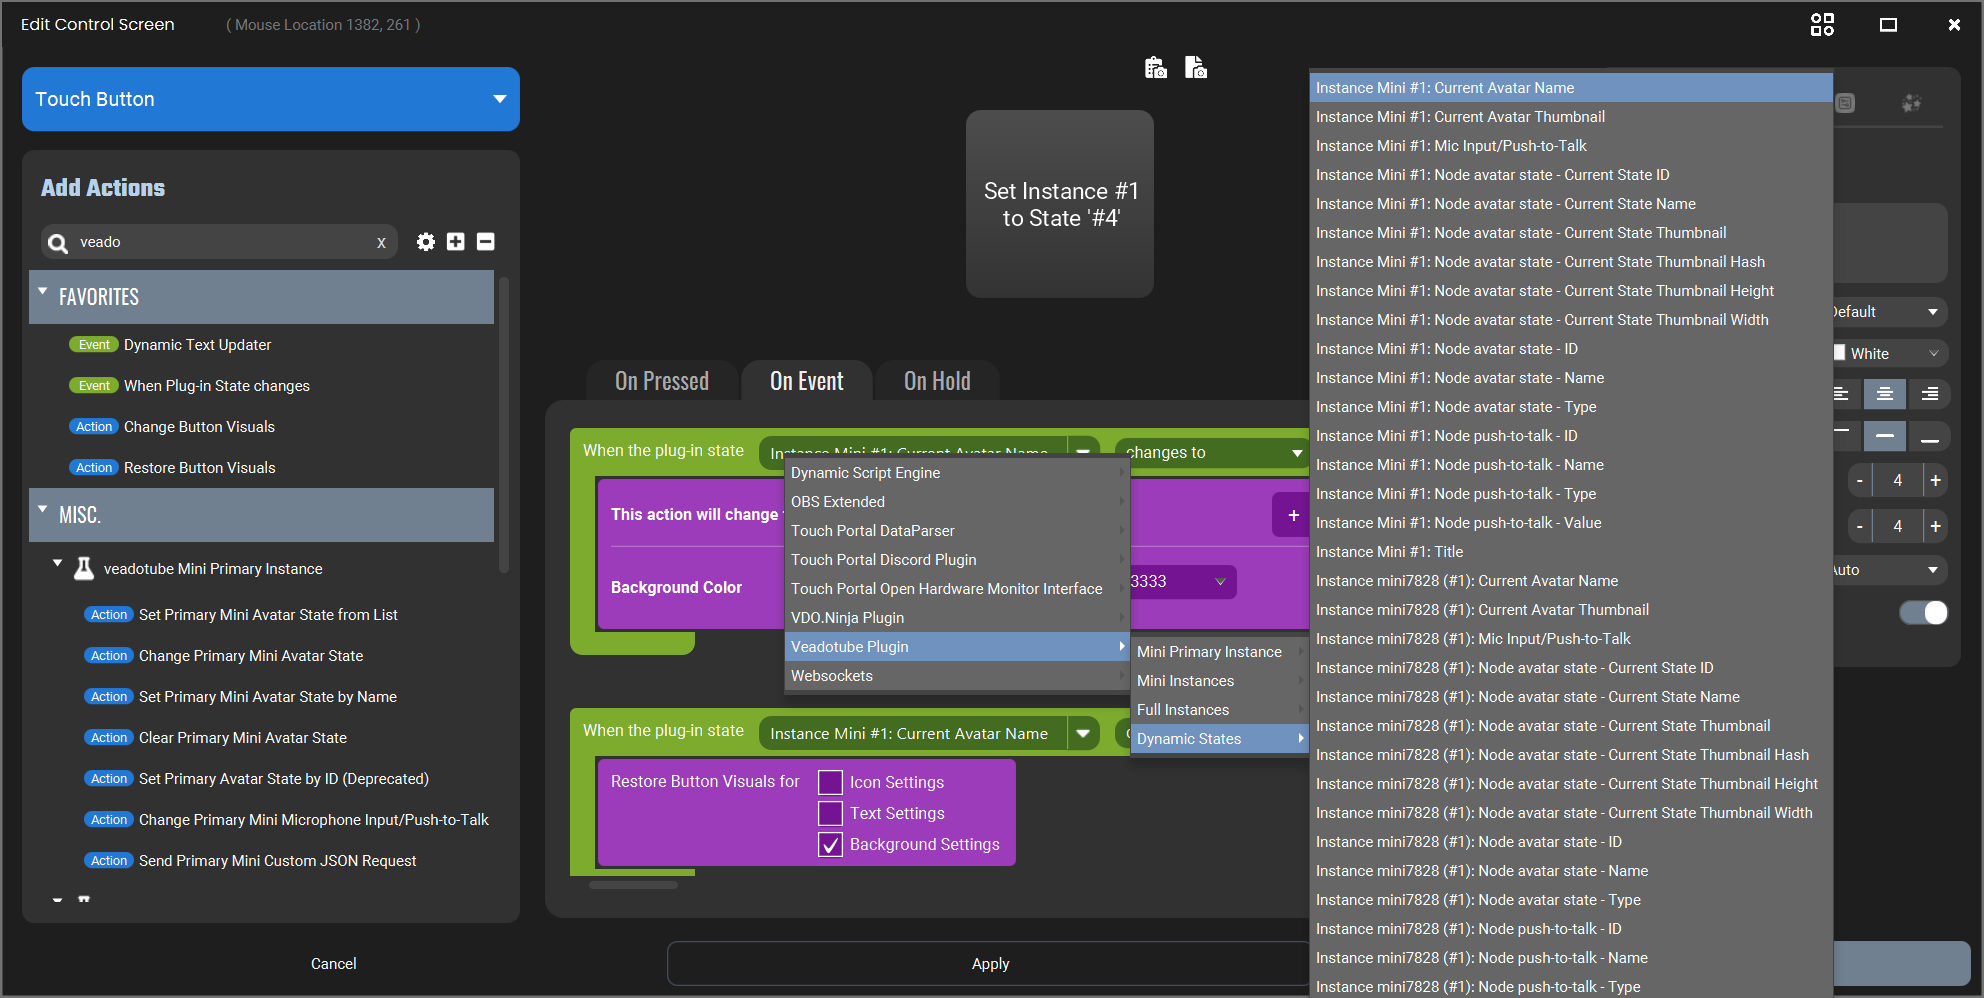
Similar to the Primary Instance, commands can be sent using Change Avatar State
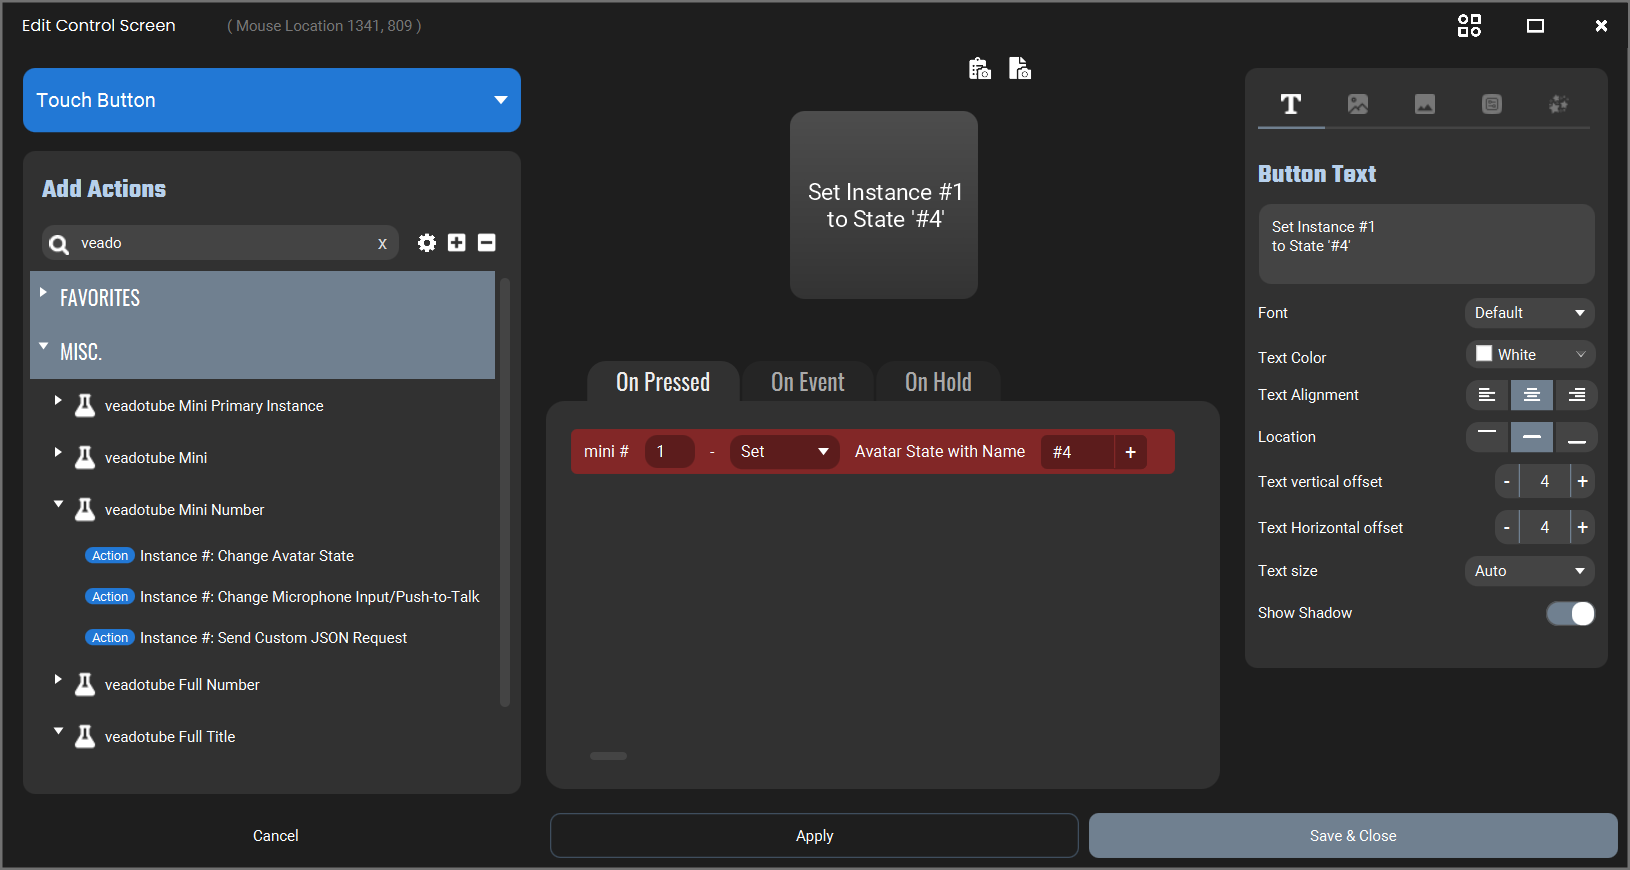
Button active in Touch Portal
Advanced - Plugin Refresh Buttons
You can create buttons to Force a refresh of the State List or current State.
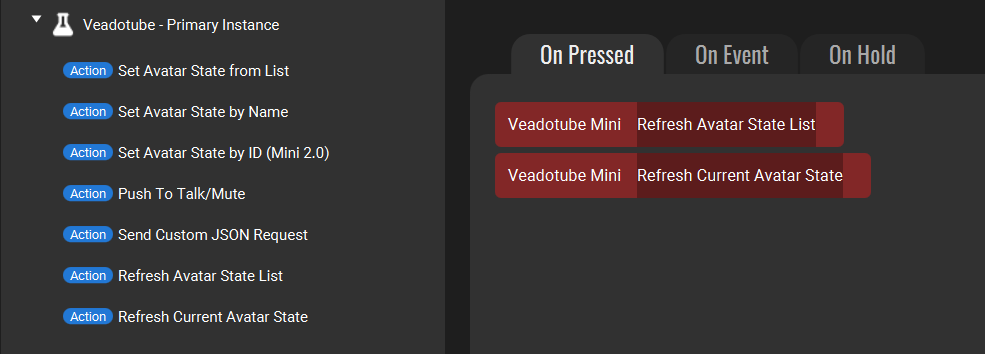
You won’t need these normally:
- The Plugin will be told when the State is switched (any veadotube version).
- Newer versions (mini 2.1+) send API updates when a State is edited (e.g. order/name/image changed), so state lists will update automatically.
- Older versions (e.g. mini 2.0a) need to be forced to refresh State Lists using this command after edits, or by restarting either Touch Portal or veadotube.
Setting up Pages in Touch Portal for veadotube
You can find an example Touch Portal Page you can download and import here
The example page and the example images below use one of the default avatars mini avatar, O Gato by BELLA!
You can find it in veadotube Mini by clicking Avatar Settings > Load Default Avatar…
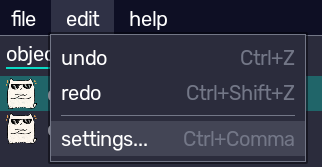
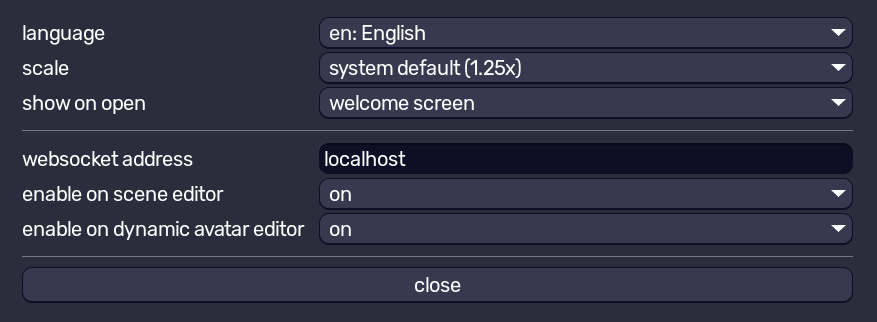
Enable Websocket in veadotube
Websocket can be enabled under Edit > Settings
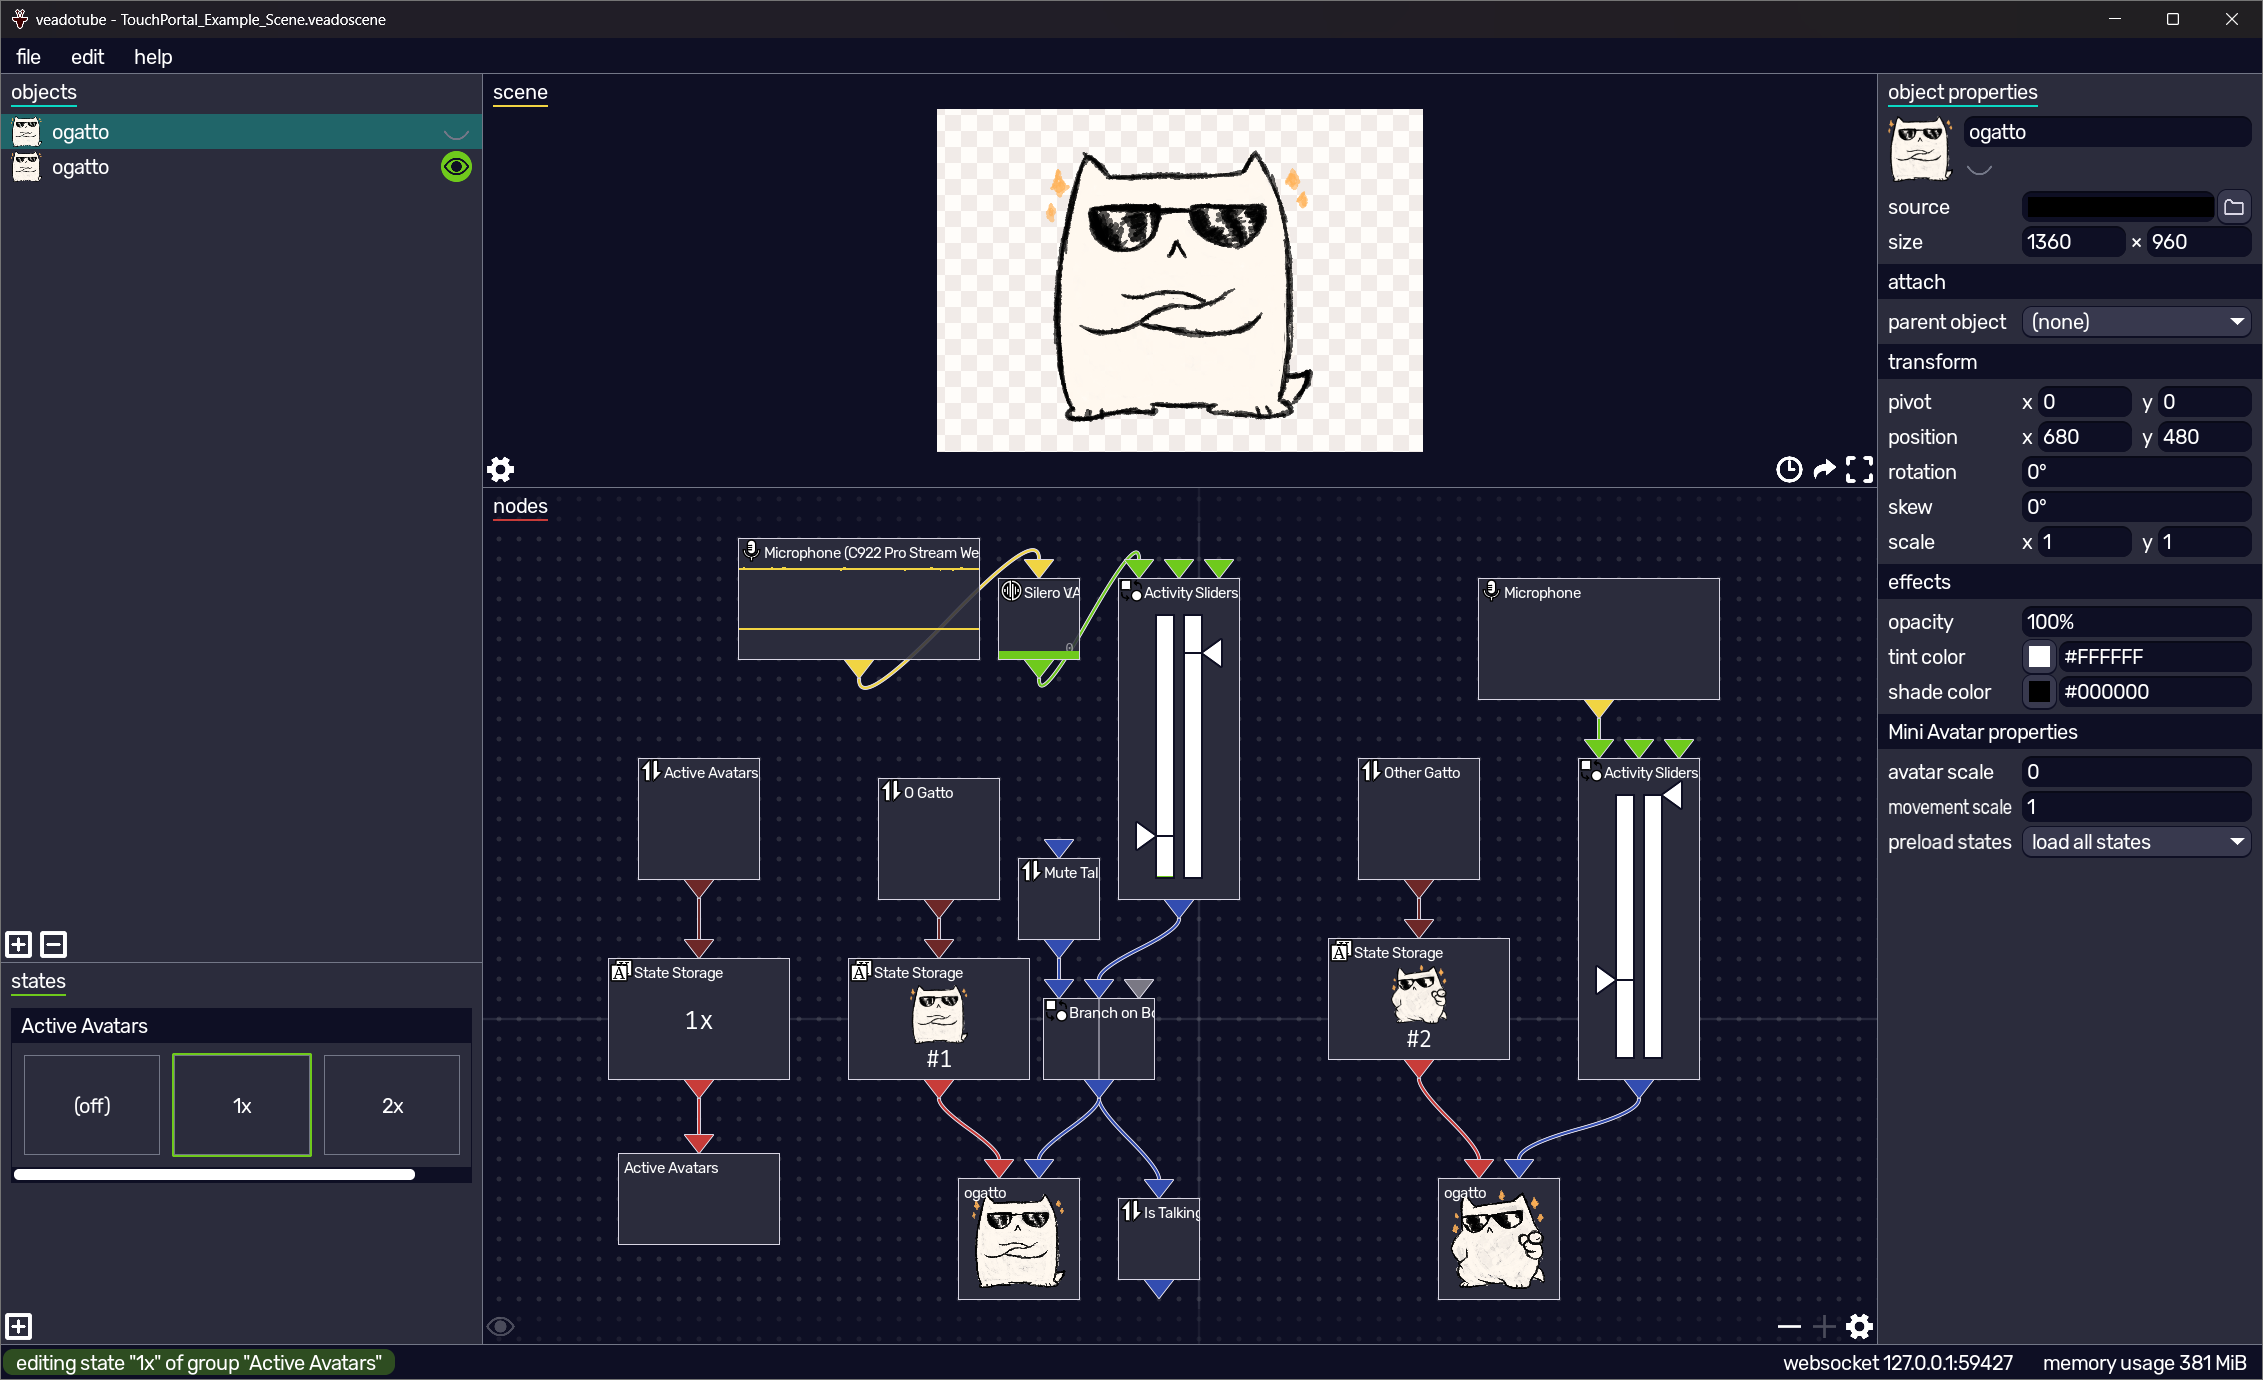
Example Scene
Creating and Getting State Values
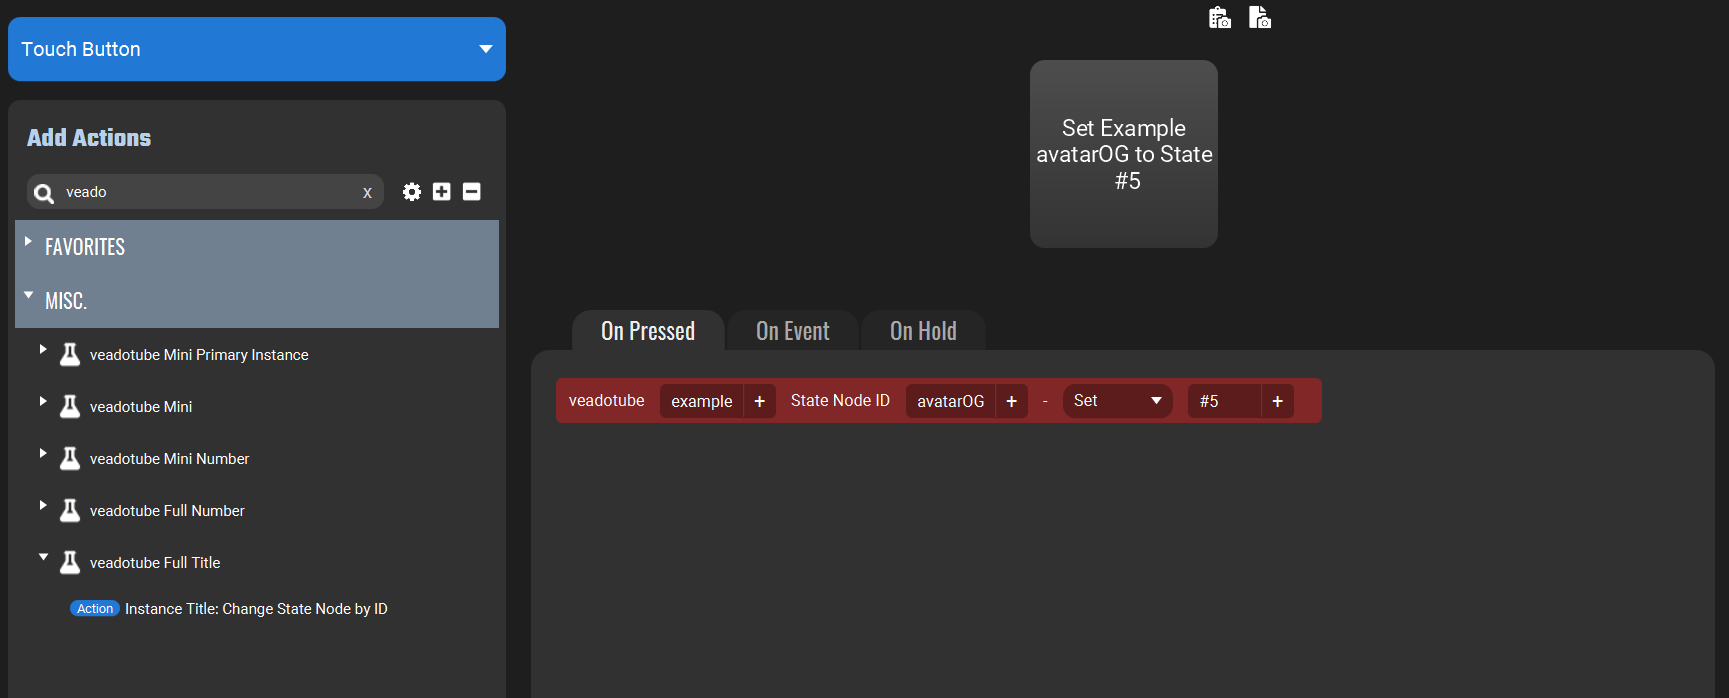
Right-Click the State Websocket and copy the ID (Make sure IDs in the scene are unique)
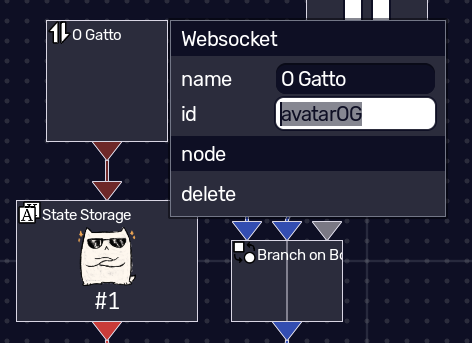
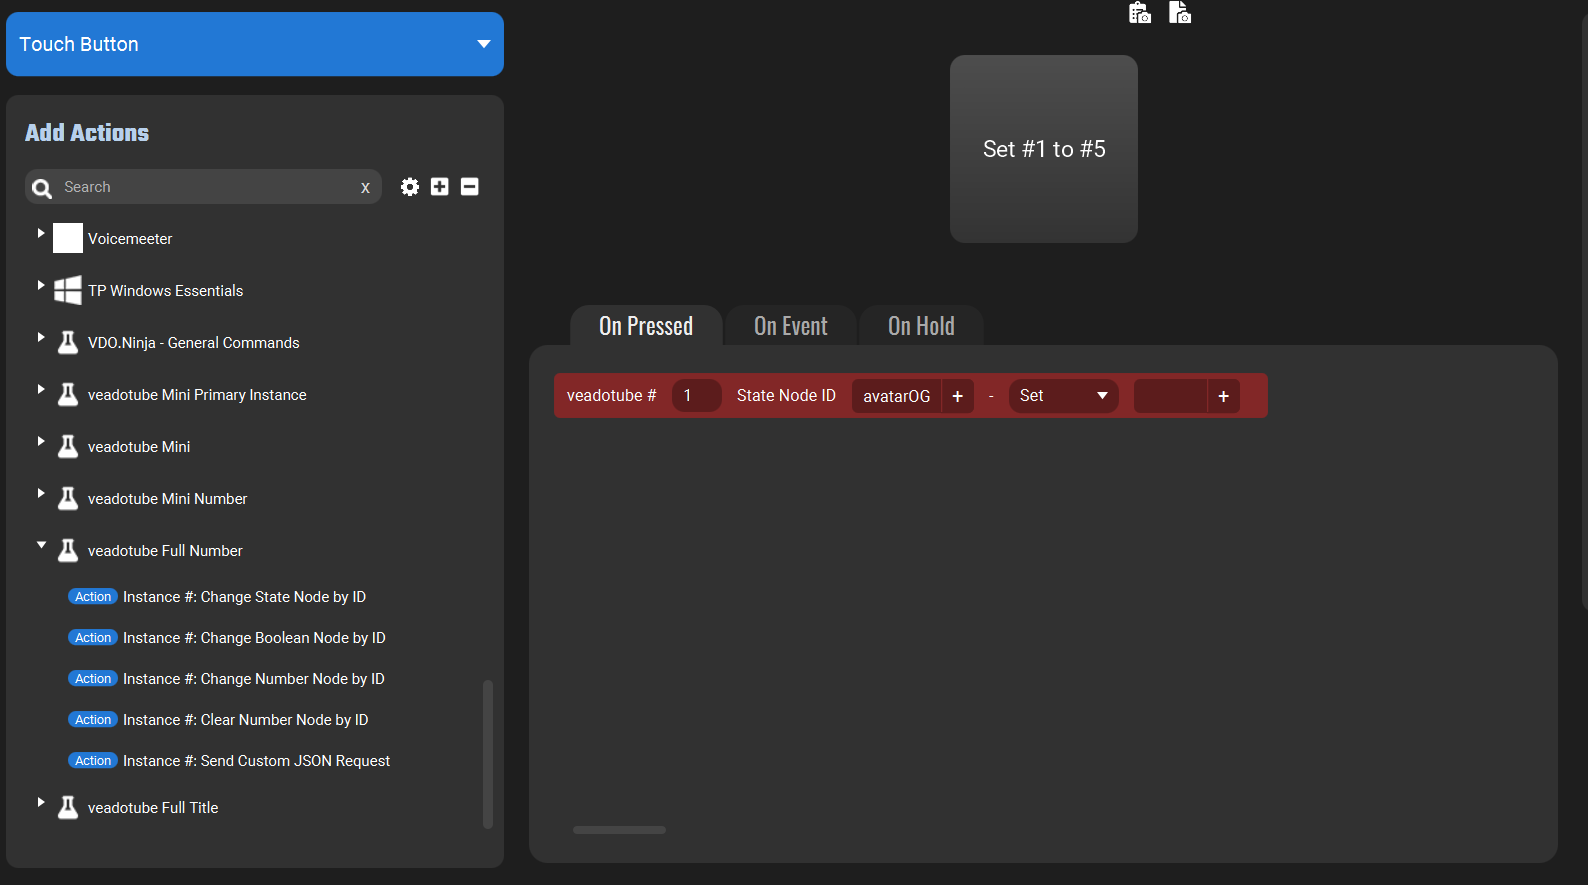
Add the Action ‘Instance #: Change State Node by ID’ and pase in the Websocket Node ID
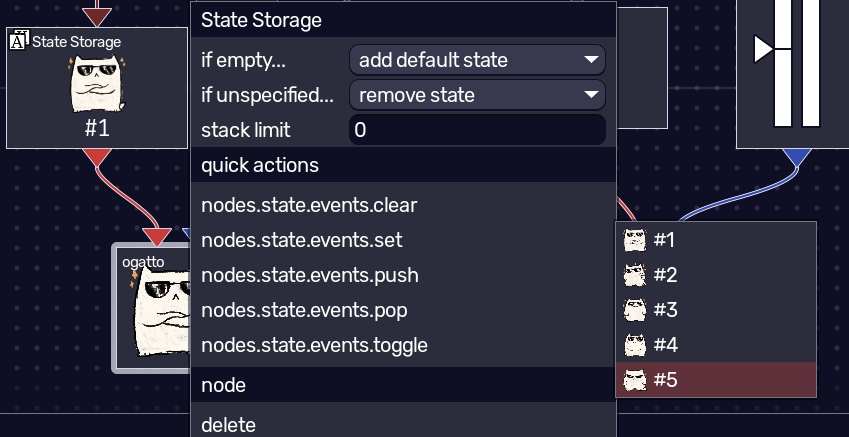
Get the name of the State Name/ID (Shown here by Right-Clicking State Storage, and clicking Set to bring up the list)
Enter the ID and select the action
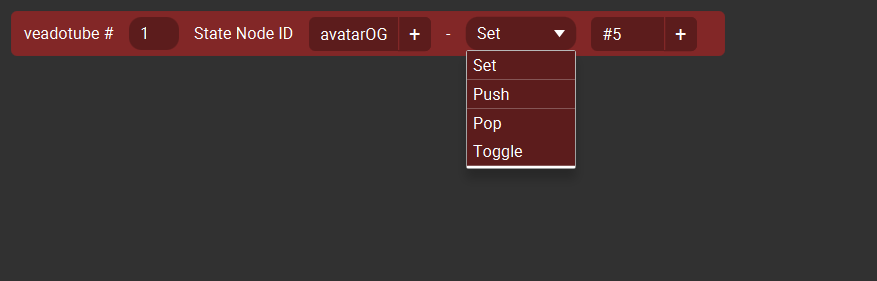
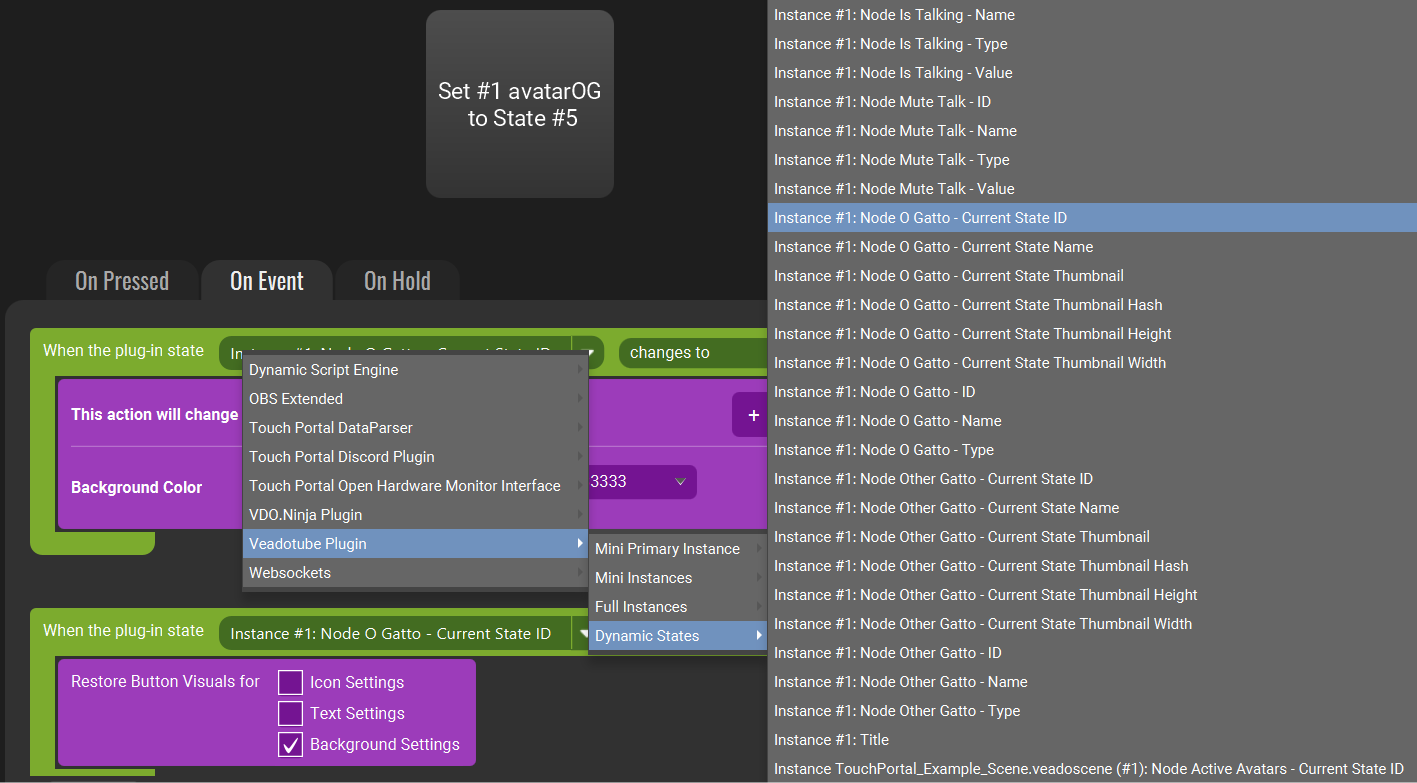
Pressing the button changes the state to #5. You can see the action stored in the
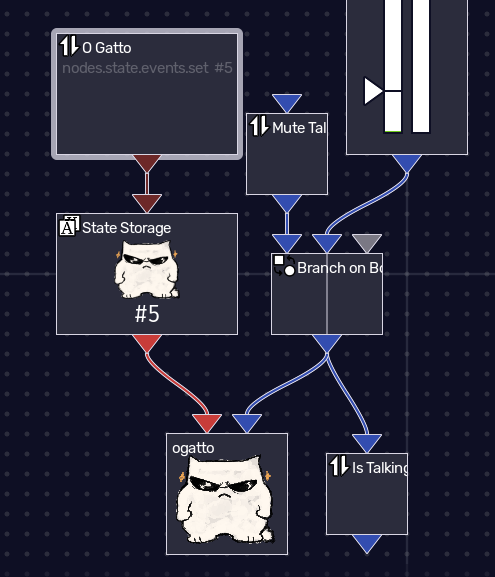
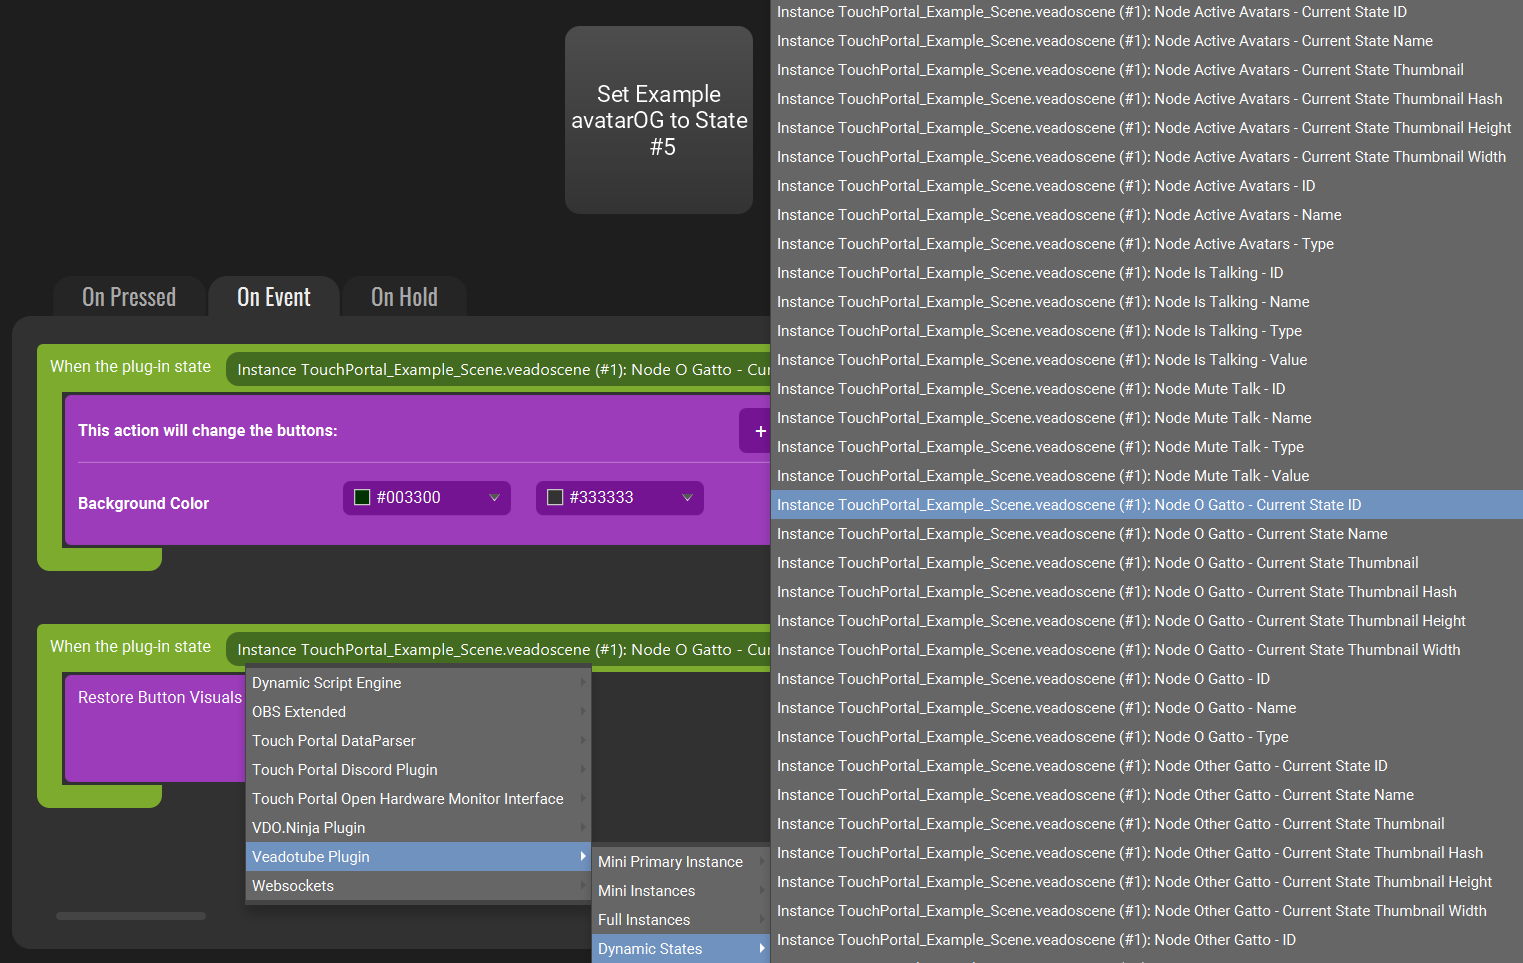
The Button can be made Reactive using the state under Full (Title) or Dynamic States. User Current State ID
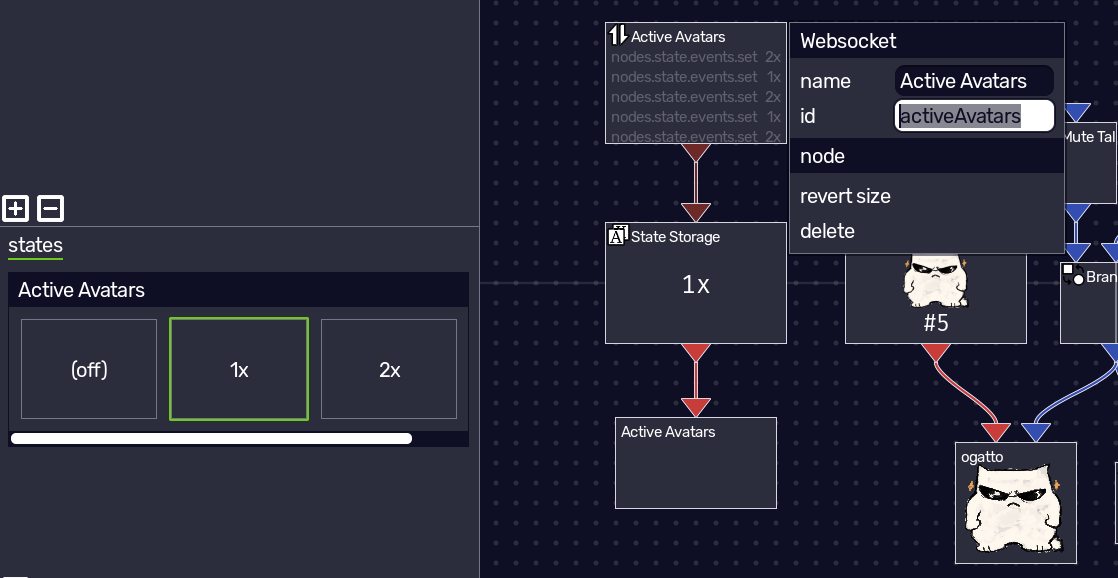
The item will have the Websocket Node Name
Using Scene State Groups to Show/Hide Avatars
Similar to above, Scene States can be controlled
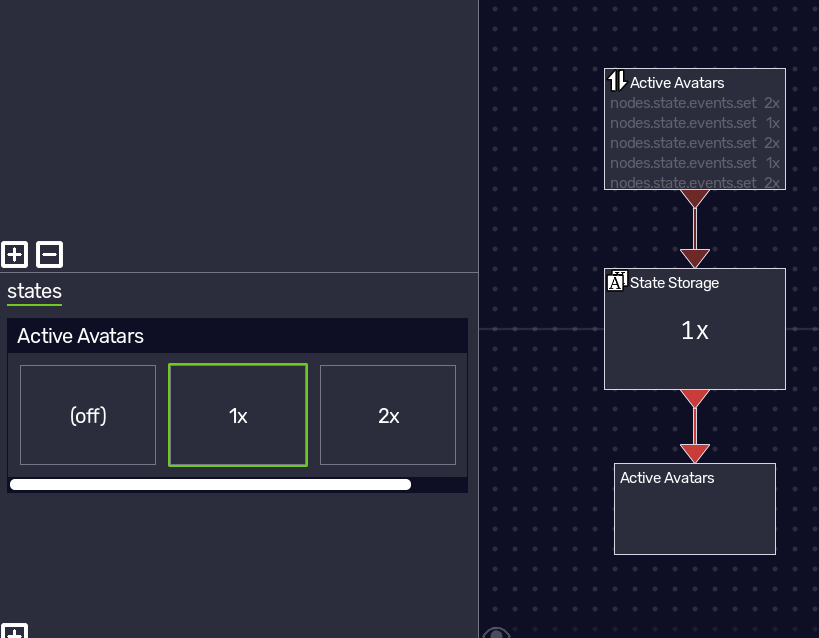
Click the + to create a new State Group - a State Group Object will Spawn in the Node editor
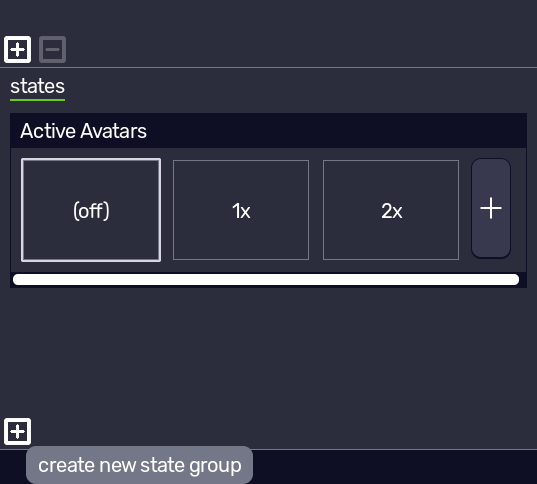
Name the 1st slot (e.g. 1x), make sure it’s selected.
Click the Eyes next to each object to Unhide the ‘main’ avatar and Hide the ‘secondary’.
They should be green to indicate the setting is changed in the selected (Note that ‘Off’ is the
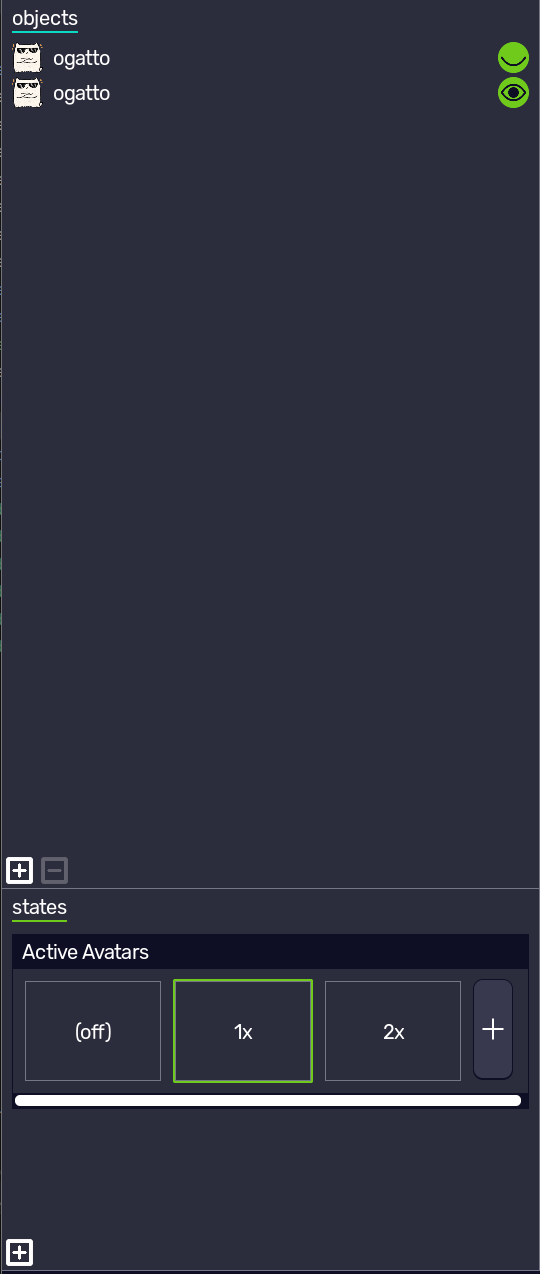
Add a second State, enable both avatars. Select both and adjust the Size/Position/etc.
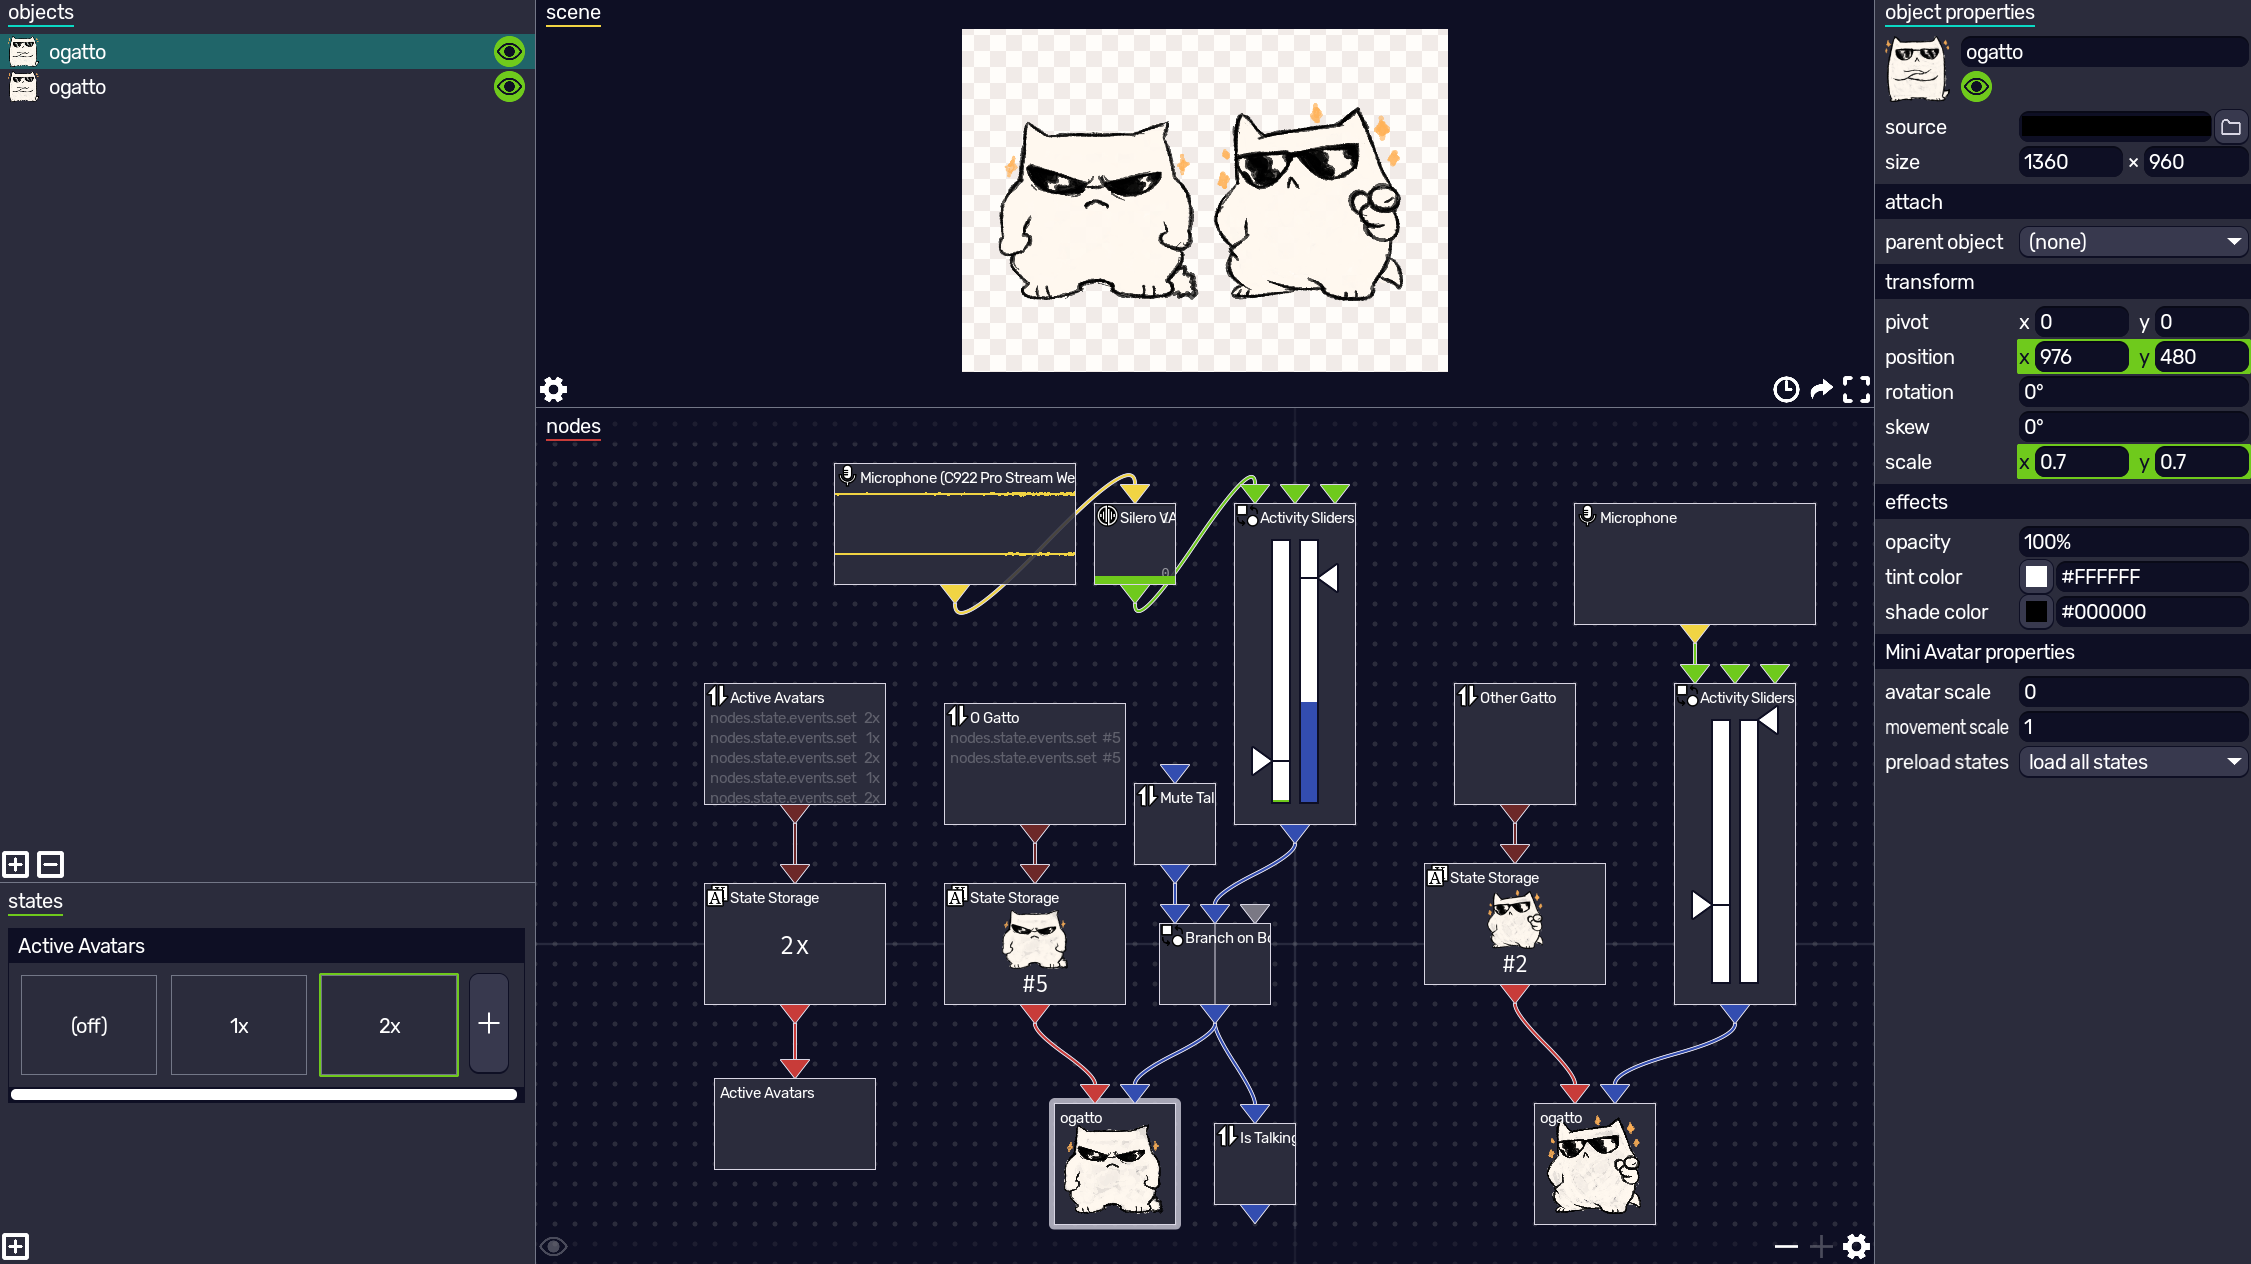
Find the Scene State Group object that was spawned in the node editor, attach a State Storage to the node, and attach a State Events Websocket object to that.
Get the ID of the Websocket node (activeAvatars)
Create a Button with Chance State Node by ID, enter the Websocket node ID and State Group Name (1x)
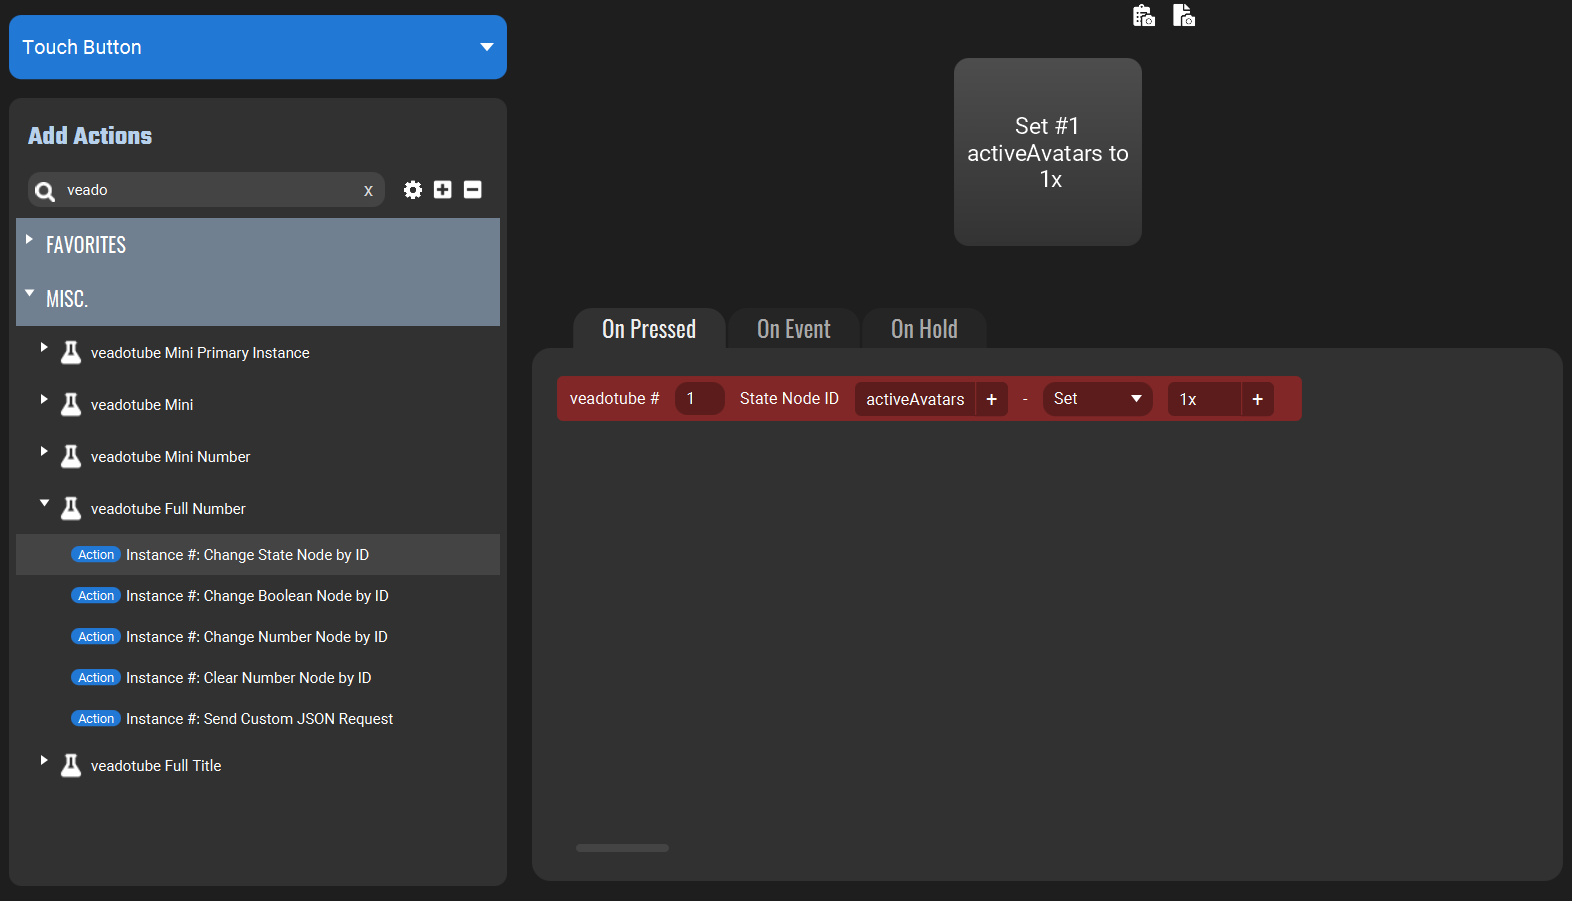
Repeat for each State
Change by Windows Title
The Window Title can also be used instead of Instance Number to select where to send commands and what values to get.
This is useful if you want to run multiple windows and want buttons etc to only act/react for one Scene file and don’t want to worry about start order (and don’t care about reusing them across files)

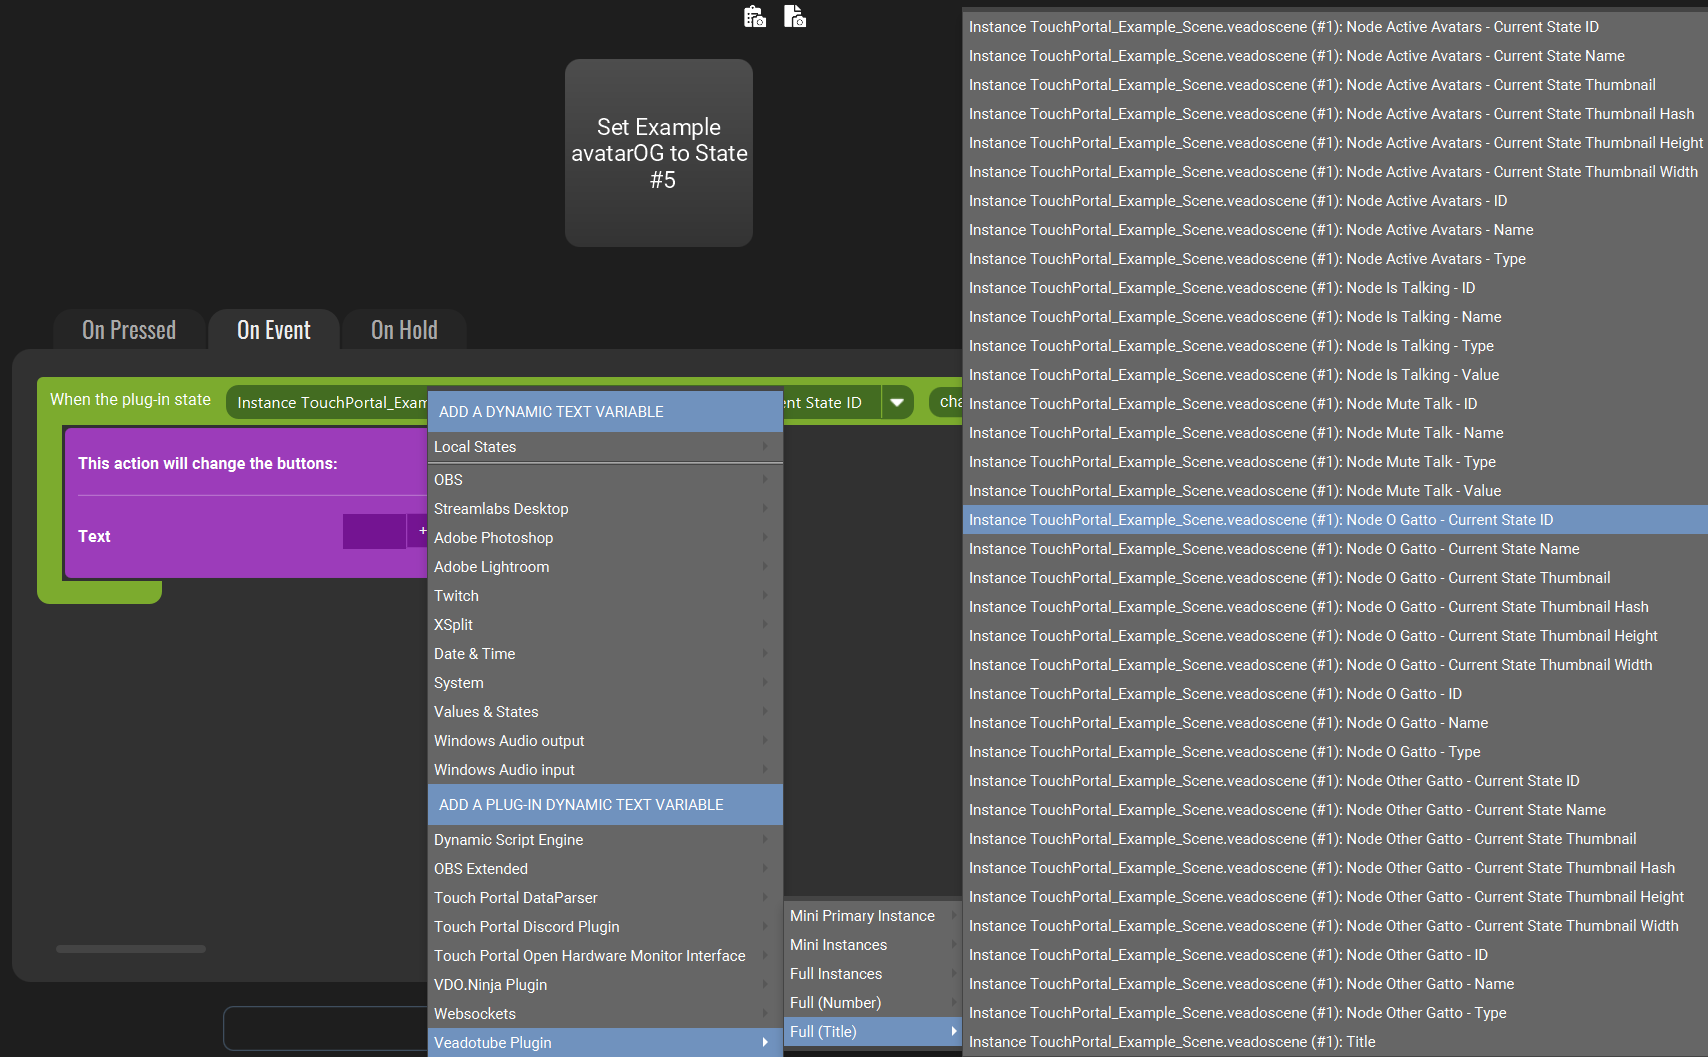
Using the veadotube Full Title Action, enter all or any part of the Title can be used to choose the veadotube window that will be sent a command (excluding the Star (*) that shows if the Scene is unsaved)
Note: Each active connection title is checked, oldest to newest, and the first match is used. In this example, ‘veadotube’ will match any window, so the first one launched is sent the command
Under the Full (Title) or Dynamic Values Menu, select find the value staring with Instance (End of Title) (Instance Number)
In this example, Instance TouchPortal_Example_Scene.veadoscene (#1)
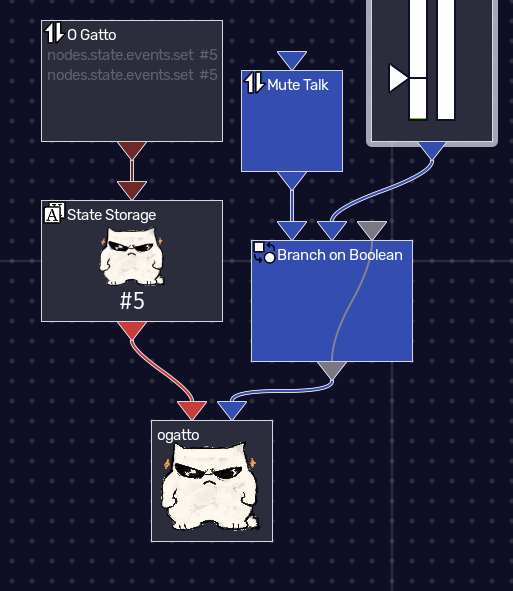
Mic Mute Example
Insert a Branch on Boolean Node after the Mic Activity Slider on the False Node, and add a Websocket Boolean Node to the Boolean Value
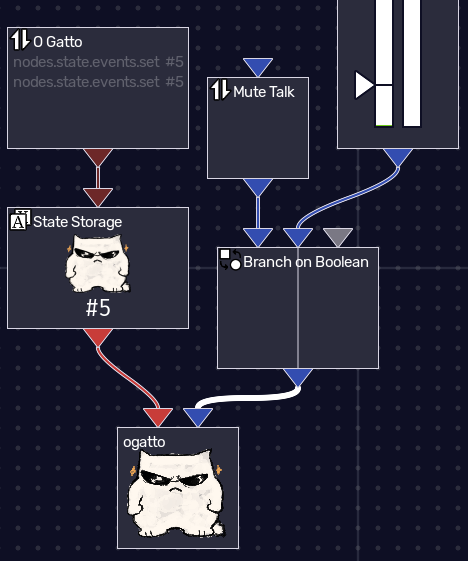
Get the Boolean Node ID

Create a Button with Change Boolean by Node ID, set the Node ID and action (Toggle in this case)
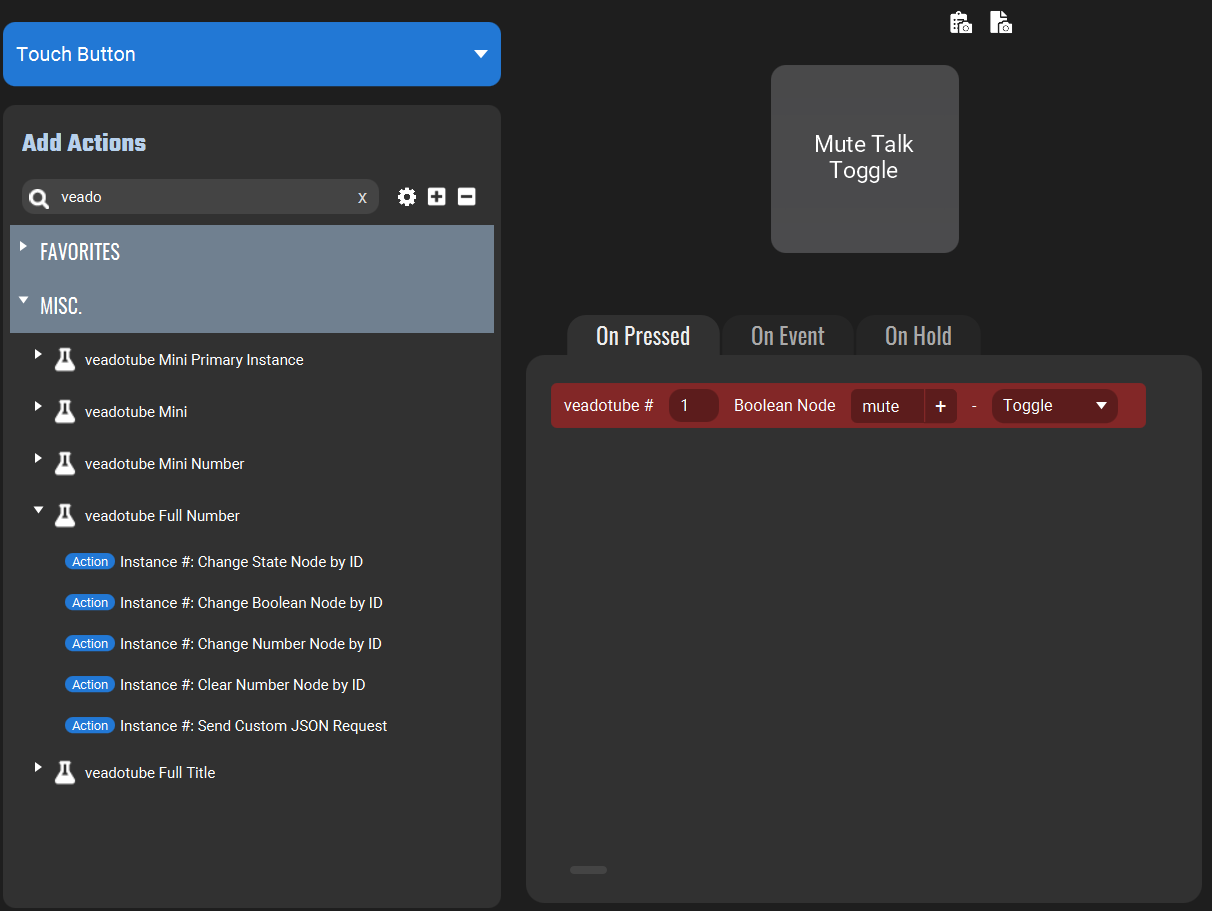
Optionally, use the Node Value to change the button when the Value Changes
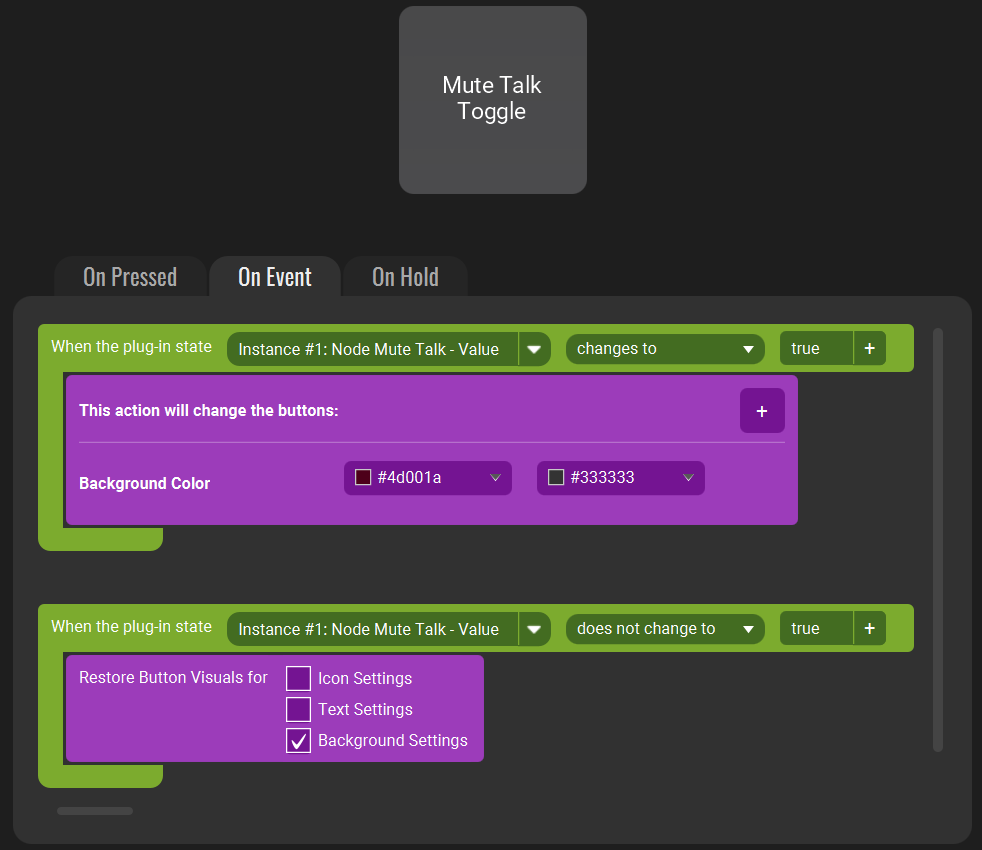
Test the button - when true, Mic input is disconnected
Other Examples
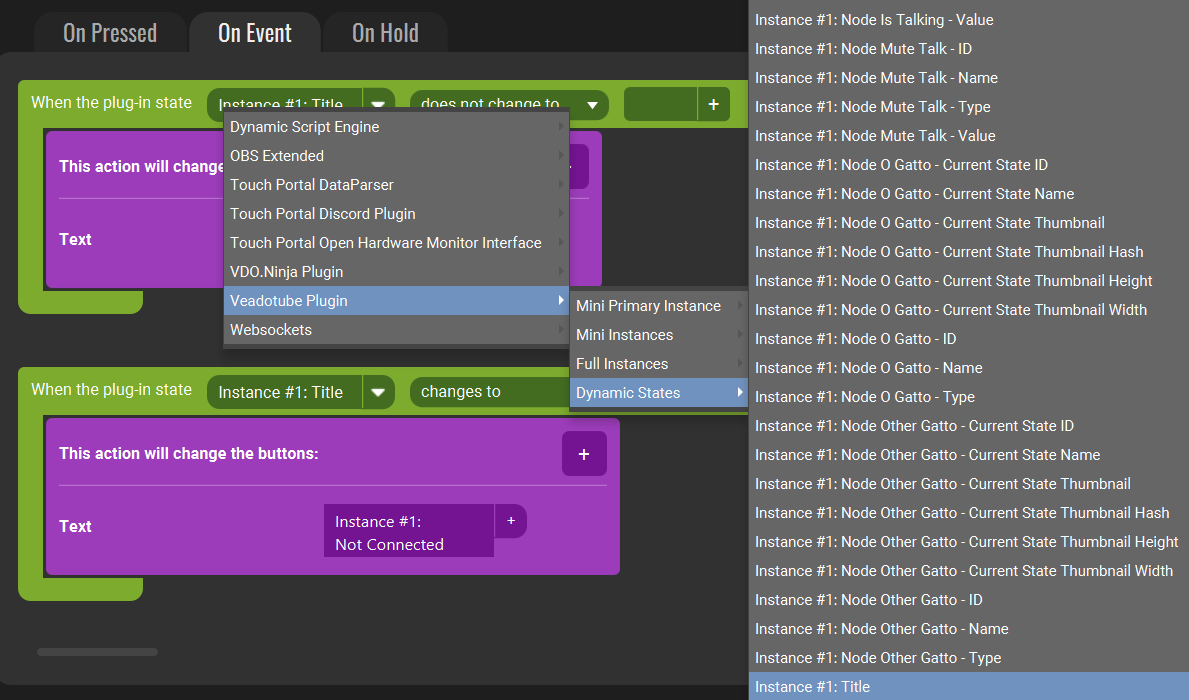
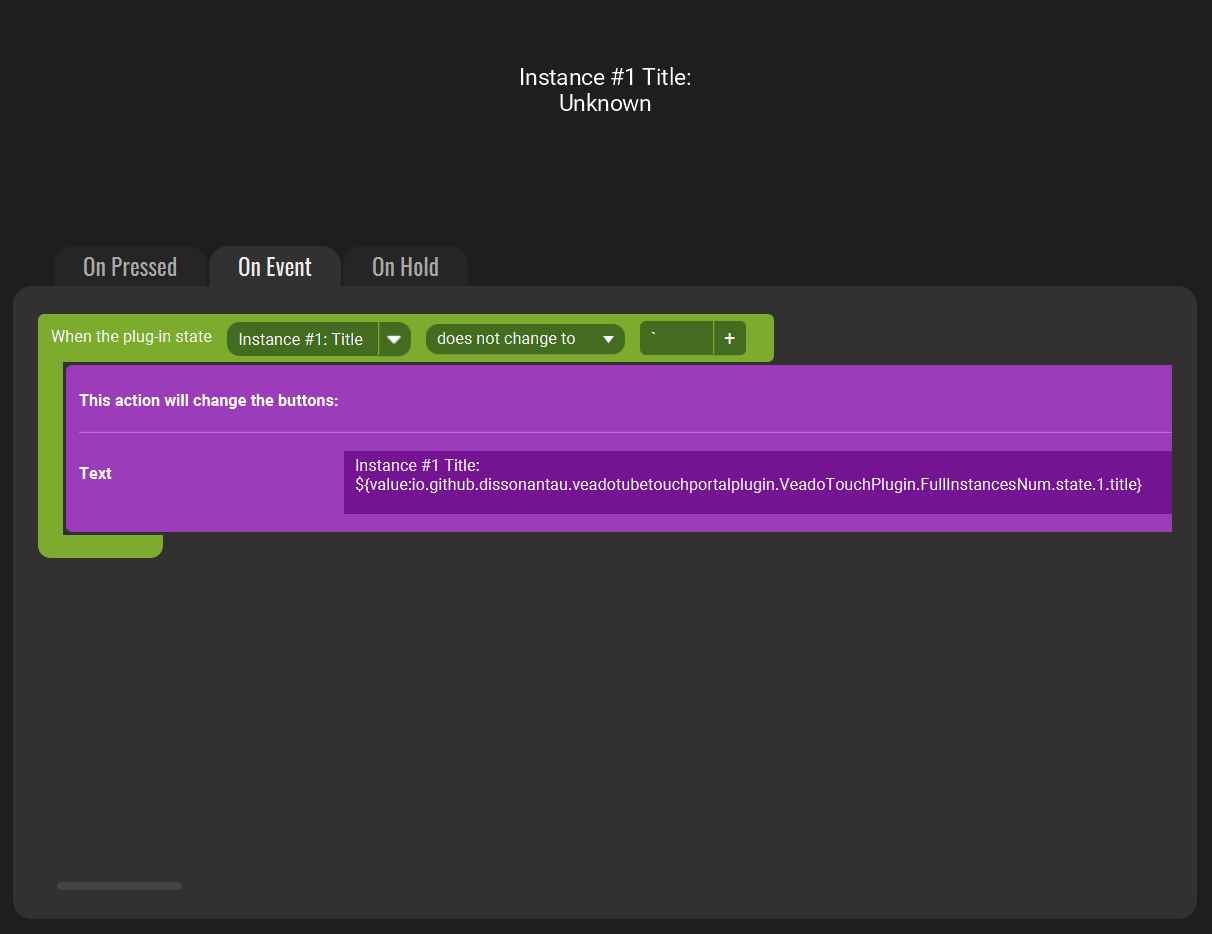
Show Instance #1 Title
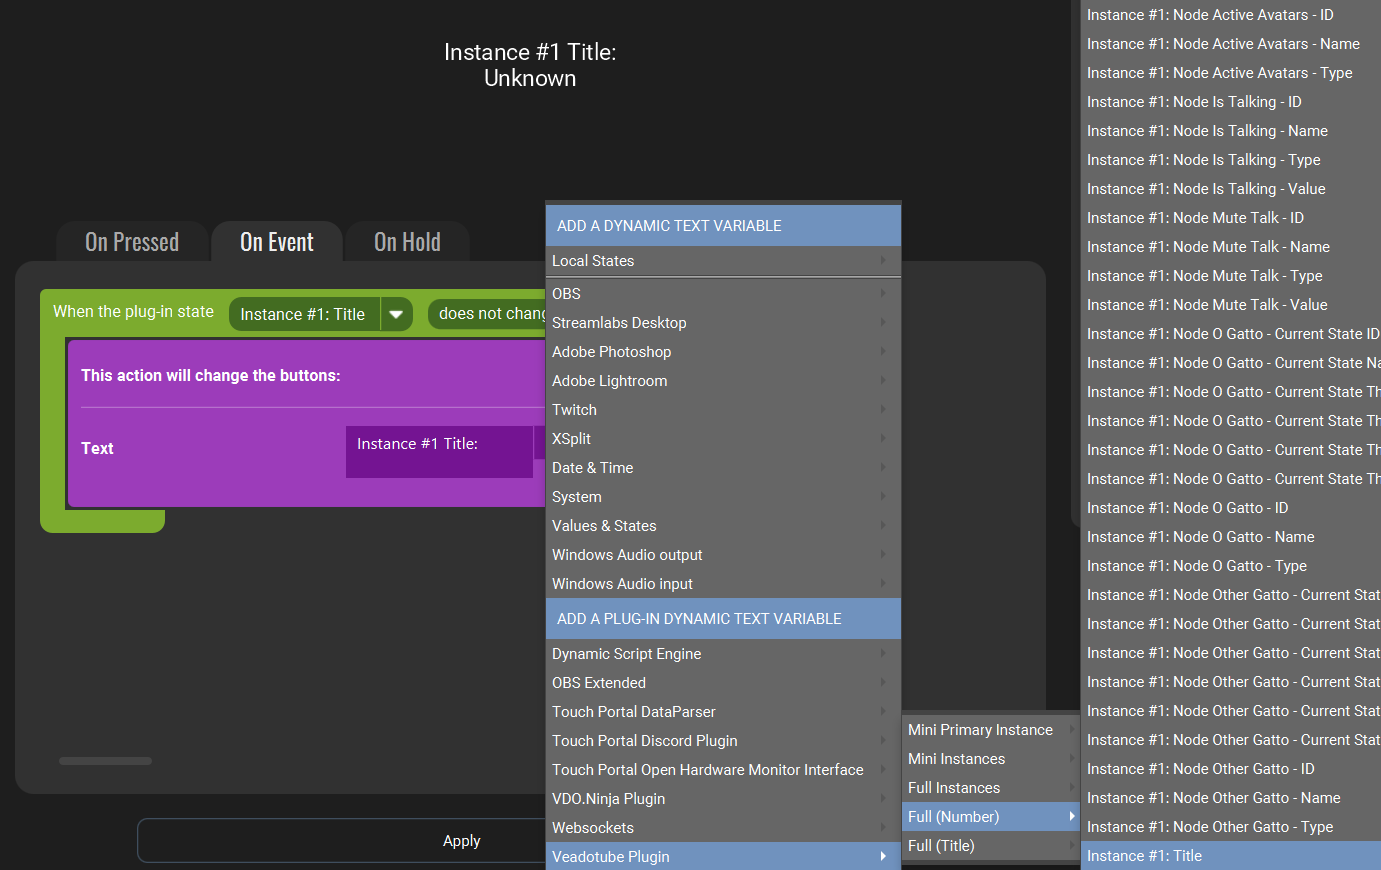
Uses ‘does not change to’ tick (`) to show current value (including blank)
Show Connected/Disconnected
Using Plug-in State Title with ‘changes to’/’does not change’ to blank to change the text